
Course Editing Guide
Frequently asked questions by course editors and quick videos about common administrative functions of Moodle
Course management
How to assign a student, co-teacher or TA?

Two options are available at the top:

| Enroll users manually | Bulk enroll users |
|---|---|
| Select by name or email from the available users one by one | Provide a list of email addresses to quickly mass enroll multiple users |
| Only existing users | You can add new CEU users without an account as well |
| No message | You have the option to send a notification email to the users |
1. Enroll users manually
Watch this short video or follow the steps below.Click on the "Enroll users manually button" > Select the appropriate role > Search for the name > Click on "enroll" next to the result.
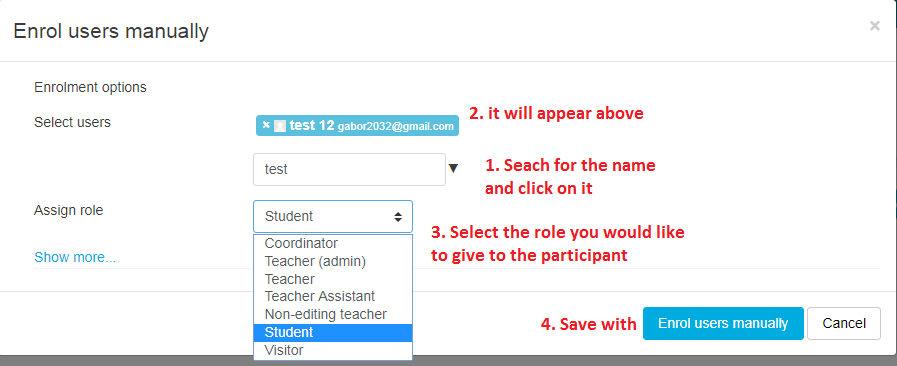
After you clicked on the Enrol users manually button, the user is assigned (no notification is sent to the user by default). If you cannot find a user during the search, these are the possible causes:
- No account is created for the user yet
If you would like to add a new CEU user, use the Bulk enroll users method - You are mistyping the name
Check the spelling. The firstname / lastname order is important, so try to use only one of them if possible - The user is already assigned on the course - check the name in the participants list.
- If you find multiple accounts for the user, please check the email address to see which one is relevant. If you are unsure, ask for help.
2. Bulk enroll users
All you need to do, is select the role (see details in point 3.) and paste the list of email addresses below. The list accepts all basic formats, copy/pasting a row from excel, separated by spaces, commas ; semicolons. Just make sure that only valid email addresses are pasted, no alumni or non-active CEU accounts will be accepted.
Two extra functions:
- You can add valid, active CEU email addresses as well, and the account is created, the user assigned
- If you tick the box, a notification is sent to users about this enrollment

Notes:
- This function has an extended version for users who have "user creation" rights, have the "invite externals" button instead, and they can use it to invite users without accounts to the course.
- Users assigned this way behave the same as with the "enroll users manually" button.
3. List of roles:
Teacher, Teacher (admin), Teacher assistant:
These course editor roles have almost the same rights, most of the time you will assign Teacher. Teacher admin has additional rights to advanced functions (copy contents between courses, like restore, import, etc.), teacher assistant can not assign other course editors to the course.
Non-editing teacher: This role cannot edit the course, but can access and grade assignments. Also it may be used to give access a grader to only a specific set of students with groups.
Student: The basic "viewer" role, hidden content is not visible for him, can take part in activities.
Auditor: A student who does not officially enroll in the course, does not submit assignments, and does not participate in activities, but is given viewing access.
Guest (special): These users do not have an account, if you enable "Guest access" in a course, anyone can access it without an account and login.
Notes:
- Manually assigned users can be easily deleted from the participants list with the "bin" icon next to them. If you cannot find a bin icon, it means the user is coming from SITS - and needs to be unenrolled there.
- The role of a user can be changed later in the Participants list with the "pen" icon next to his name.