Course Editing Guide
| -: | CEULearning |
| Course: | CEULearning |
| Book (multi-page text): | Course Editing Guide |
| Printed by: | |
| Date: | Tuesday, 16 June 2026, 12:38 PM |
Description
Frequently asked questions by course editors and quick videos about common administrative functions of Moodle
Table of contents
- Table of Contents
- Quick Start Guide for instructors
- Course management
- How to create a course?
- How to copy content from a previous course? (Import)
- How to change the course name or other settings?
- How to assign a student, co-teacher or TA?
- Course access by students
- How to give access to readings for non-CEU users (Guests)
- External accounts - for users who will not get a CEU account
- How to manage multi-group or online / offline courses?
- Copy selected contents between courses - Sharing cart and Mass actions block
- Basic Course Editing
- How to upload readings/materials?
- How should I add text to the Course?
- The Moodle text editor and accessibility
- Learning Components and Collapsed Contents in the Editor
- Move / edit existing contents
- How to Rearrange (change the order of) whole sections?
- How to Add or Delete Course Sections
- Visibility of Course Contents (readings, sections)
- How to communicate with students?
- How to change course header images?
- Download course content (and syllabus)
- Create Activities (give tasks to students)
- Creating an assignment and settings
- Assignment - Grading and Feedback
- Assignments with Turnitin
- How to enable students to modify their submitted assignments?
- Originality Reports
- How to create a timed, simple essay type exam in advance?
- Blind marking assignments (anonymous student uploads)
- Creating a forum and forum settings
- Create an exam with Quiz
- Ensuring Exam Security: Closed and Open-Book Exam, Safe Exam Browser
- How to do a survey for the students with the Feedback activity
- How to create an attendance sheet with the Choice or Checklist activity?
- How to create a sign-up sheet with a wiki
- How to create a Board for students to post and vote (Padlet substitute)?
- Other available activities
- Grading in Moodle
- How to use and modify weights in the gradebook?
- Restrict access - How to give access to resources to one (or a few students)?
- How to create groups and set up group work for activities?
- Groupings - different set of groups in one course
- Panopto - share/upload videos in Moodle
- Short audio and video directly from Moodle
- Interactive videos and presentations with H5p
- Perusall
- Zoom meetings
- Turnitin - plagiarism detection software
- How to manage Thesis submissions after EtD?
Table of Contents
General technical problems (student guide)Quick start guide for new instructors
- Course management
- How to create a course?
- How to change the course name or other settings?
- How to change course header images?
-
How to copy all contents from a previous course? (Import) - or copy single activities between courses (sharing cart)
- Course accessibility (Enrollment key, Hidden course, Self-enrollment)
- How to assign a student, co-teacher or TA? (add users manually from the Participants menu)
- How to give access to readings for non-CEU users (Guests)
- External accounts - for users who will not get a CEU account
- How to manage multi-group (or offline/online) courses?
- Basic Course Editing
- How to upload readings/materials?
- Download course content (and syllabus)
- How should I add text to the course?
- Move / edit existing contents
- How to move (change the order of) whole sections?
- How to Add or Delete Course Sections
- Visibility of course contents (readings, activities, sections)
- How to communicate with students?
- How to create activities (give tasks to students)
- Creating an assignment and settings
- Assignment - Grading and Feedback
- Assignments with Turnitin
- Potential student problems with assignments (submit, modify after the due date)
- Originality reports
- How to create a timed, simple essay type exam in advance?
- Blind marking assignments (anonymous student uploads)
- How to enable students to upload videos into Panopto (assignment folder)?
- Create an exam with quiz (with multiple choice questions - Moodle.org guide)
- Ensuring Exam Security: Closed and Open-Book Exam, Safe Exam Browser
- Choice and feedback (PDF) - (Moodle.org guide)
- How to do a survey for the students with the feedback activity
- How to create an attendance sheet with the choice or checklist activity?
- How to create a sign-up sheet with a wiki? (Collaborative document editing) - (Moodle.org guide)
- How to enable easy file sharing in a course with the student folder (PDF)
- Peer review (workshop activity)
- How to create a Board for students to post and vote (Padlet substitute)?
- Other, not common activities
- Videos with Panopto - share/upload videos in Moodle
- How to enable students to upload videos into Panopto (assignment folder)?
- How to record a short video directly from Moodle (this can be used with forum posts for course introduction videos)
Quick Start Guide for instructors
Moodle is Virtual Learning Environment used by CEU (often referred to as the “e-learning site”). You can use it from any computer with internet access. It is the central place to provide all the necessary information to students about a course and to supplement offline work with online activities.
This help material contains the basics to get started.
Login
1. After you receive your username / password from CEU IT, make sure that you log in to your MS account (CEU email) first at https://portal.office.com and set it up (change password, multi-factor authentication)
2. Then to log in to Moodle, go to https://ceulearning.ceu.edu
![]() At the top right you will see the MS icon needed for login.
At the top right you will see the MS icon needed for login.
Note: You CANNOT change your password on the e-learning site directly, but if you change your Microsoft password it will change your e-learning password as well.If you have any problems accessing the site or having password issues, please contact the IT Helpdesk.
Where to Find your Registered (enrolled) Courses?
Right after logging in you may find your enrolled courses in the “My courses” menu at the top navigation panel or at the “My enrolled courses” block on your Dashboard. If you cannot find a course, ask your coordinator - maybe you are not assigned on it yet.
Basic course editing
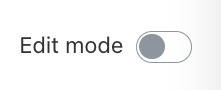
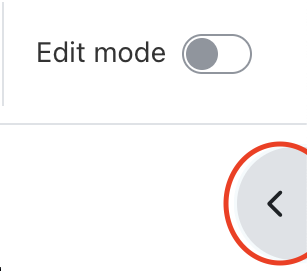
After you log in and visit your course, always start with turn EDIT mode on (top right corner). Use the appearing icons and menus to add, change, move, edit content.
1. You can simply drag and drop files into the course from your computer (or pictures, selected text from a word file, etc.)
How to upload readings/materials?
2. Add text to the course page with section summaries and labels
How should I add text to the Course?
3. Add activities to the course - like assignments
Other important, basic topics
Visibility of Course Contents (readings, sections)
How to communicate with students?
Other basic resources
Course example: Check out how a basic course should look like
Most of the time, "normal" courses are structured by sessions/weeks (so you put materials for the first session into the first topic, and so on).
Course management
- How to create a course?
- Course accessibility (Enrolment key, Hidden course, Self-enrolment)
- How to assign a co-teacher or TA? (or a student manually)
- How to open the course for non-CEU users (Guests)
How to create a course?
Please log in and check if you have your course created already at http://ceulearning.ceu.edu/my/
Important:
We can copy in the contents (or just some sections) from previous courses into the new one so you do not need to create a course again from scratch.
If you do not see the course in the list, or would like previous contents copied, please write a request with the most important details and it will be created shortly. We will need the following:
- course name
- department
- do you need some content copied into the course?
- do you have a TA or co-teacher?
How to copy content from a previous course? (Import)
Import copies content from other courses. Mostly readings, sections, and activities, but no user data (such as submitted assignments or forum posts) or course settings (like course summaries) will be imported.
Section summaries and course images are copied only if the target course does not already have them. Activities and readings may be duplicated if repeated.
1. Go to the new, empty course (the "Target"), where you would like to copy previous content.
1a) If the target course is not empty or if you would like to copy in content from multiple courses, you can look into other solutions.
The "sharing cart" block allows to save content (individual resources and whole topics) into a block and then reuse it later (so it is useful when you would like to use contents in multiple places.)
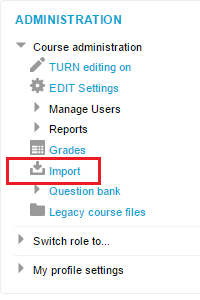
2. Select "Import" from the administration menu.
3. Select the "source" course (if there are too many, search for it first).
The system will try to offer the previous versions of this course. You can check them in a new tab as well before importing to make sure.
The system will always show the courses which have the same course code, regardless of this search.
If you cannot see the correct course:
a) Probably the title changed from last year, so the automatic search cannot find it. Delete the title from the search field and copy/paste the course title of the SOURCE course, and hit search.
Make sure, that you copy the correct version of a course (with the "Check source" link). Do not import multiple courses in (or the same course twice), as you will have duplicate contents!
b) You do not have editing rights to the past course - ask for help!
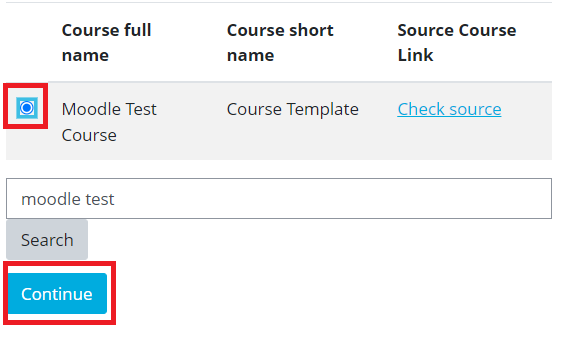
4a. If you would like to copy the full course into an empty course:
After you selected the course, click on "Continue", then "Jump to final step"
4b. If you would like to copy only selected content from the source, click "NEXT" instead.
The contents will be always copied to the same topic in the new course (from topic 3 to topic 3, etc.), the location can be changed after the import process.If you would like to copy a section into a course which is not empty, the best practice is the following:

5. The first page does not need to be modified, just click NEXT again.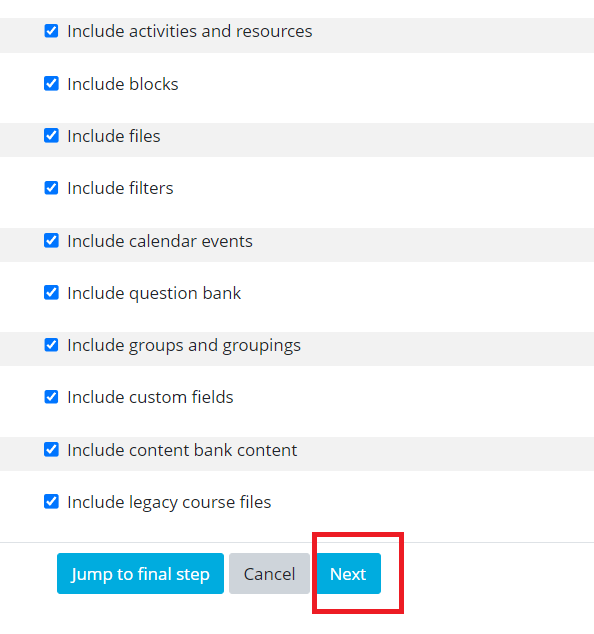
6. On the second page, deselect the contents you do not want to copy then click NEXT again, and Perform import.

You are done - now you can edit your new course.
Notes:
- The contents will be always copied to the same topic in the new course, the location can be changed after the import process.
How to rearrange (change the order of) whole sections? - The summaries (text at the top of the topics) will be always copied if the summaries of the target course are empty, and omitted if the target course has some content in the summary area.
- embedded Panopto videos copied into the new course will not work properly, these need to be added with the Panopto activity.
How to change the course name or other settings?
Open your course, and select the course settings under the course header image.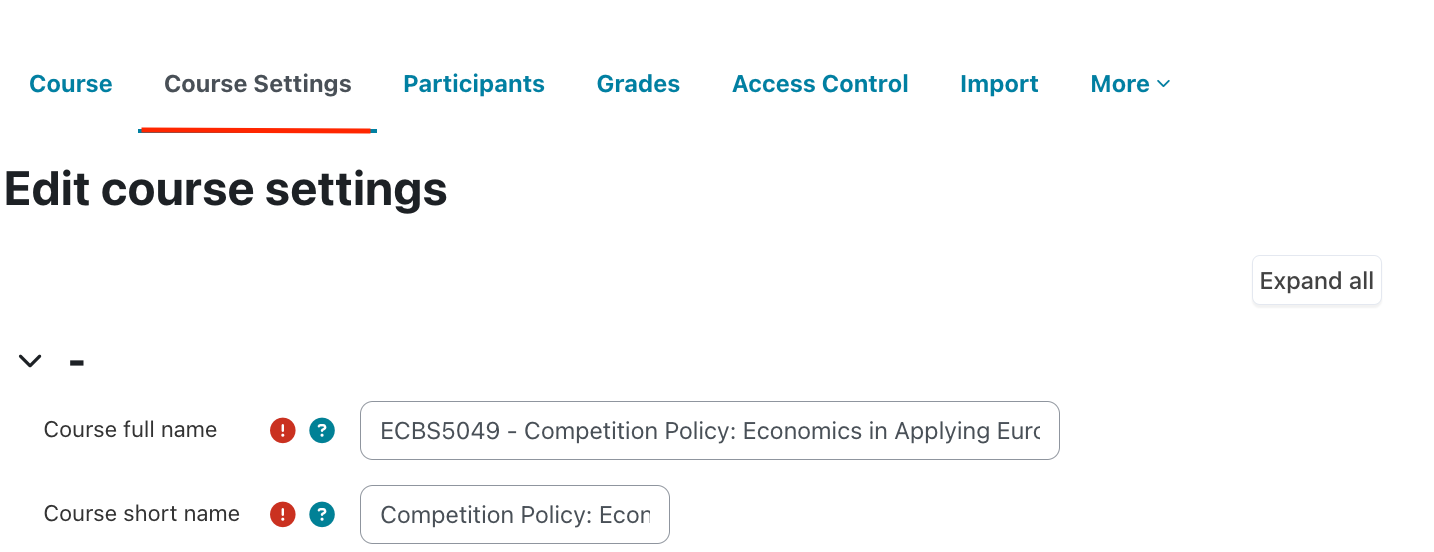
You can change the course title at the form:
- Full name: This is the course title. You should always indicate the Year/term at the end (2021/22 Fall). For multiple groups, you should indicate this as well.
- Short name: Short title (this will show up in the “breadcrumbs” listing) If it is not unique, the system will prompt you for a different name when you try to save your settings. It is recommended to use a name you and your students will be able to easily identify.
If something important change for your course in SITS, like the term, or the course code, then other fields need to be changed in Moodle as well. You do not have the rights to change it, contact your coordinator.
- Course format: Open the sub-menu to change this setting. The default is "topics" format, which means that the sections are marked with " Section 1, 2..." etc. You can select "weekly" format instead, this way the course will automatically calculate dates from the course "start date" for each section.
The single activity format can be handy for special courses, when you only want one activity, like a forum to be in the course. - Summary: A paragraph explaining the “course” (Students and Guests will be able to see this without enrolling to the course). You can copy/paste the relevant summary from your syllabus here. You can also upload “course summary” files if needed (syllabi). This can be really useful, if you would like to share some information with students without SITS registration. You can find more about this at "Possibilities outside a course".
NEW: You can restrict CEU users for this summary. The summary info will be also displayed in the footer section of the course.
How to assign a student, co-teacher or TA?
Open the course and the Participants menu under the course header
Two options are available at the top:

| Enroll users manually | Bulk enroll users |
|---|---|
| Select by name or email from the available users one by one | Provide a list of email addresses to quickly mass enroll multiple users |
| Only existing users | You can add new CEU users without an account as well |
| No message | You have the option to send a notification email to the users |
1. Enroll users manually
Watch this short video or follow the steps below.Click on the "Enroll users manually button" > Select the appropriate role > Search for the name > Click on "enroll" next to the result.
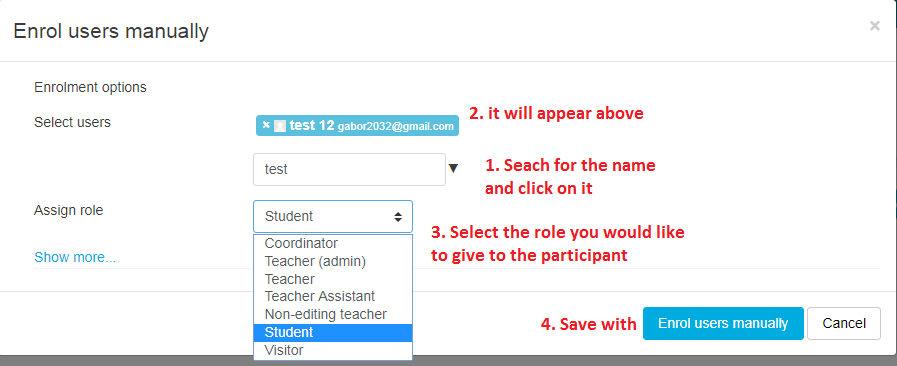
After you clicked on the Enrol users manually button, the user is assigned (no notification is sent to the user by default). If you cannot find a user during the search, these are the possible causes:
- No account is created for the user yet
If you would like to add a new CEU user, use the Bulk enroll users method - You are mistyping the name
Check the spelling. The firstname / lastname order is important, so try to use only one of them if possible - The user is already assigned on the course - check the name in the participants list.
- If you find multiple accounts for the user, please check the email address to see which one is relevant. If you are unsure, ask for help.
2. Bulk enroll users
All you need to do, is select the role (see details in point 3.) and paste the list of email addresses below. The list accepts all basic formats, copy/pasting a row from excel, separated by spaces, commas ; semicolons. Just make sure that only valid email addresses are pasted, no alumni or non-active CEU accounts will be accepted.
Two extra functions:
- You can add valid, active CEU email addresses as well, and the account is created, the user assigned
- If you tick the box, a notification is sent to users about this enrollment

Notes:
- This function has an extended version for users who have "user creation" rights, have the "invite externals" button instead, and they can use it to invite users without accounts to the course.
- Users assigned this way behave the same as with the "enroll users manually" button.
3. List of roles:
Teacher, Teacher (admin), Teacher assistant:
These course editor roles have almost the same rights, most of the time you will assign Teacher. Teacher admin has additional rights to advanced functions (copy contents between courses, like restore, import, etc.), teacher assistant can not assign other course editors to the course.
Non-editing teacher: This role cannot edit the course, but can access and grade assignments. Also it may be used to give access a grader to only a specific set of students with groups.
Student: The basic "viewer" role, hidden content is not visible for him, can take part in activities.
Auditor: A student who does not officially enroll in the course, does not submit assignments, and does not participate in activities, but is given viewing access.
Guest (special): These users do not have an account, if you enable "Guest access" in a course, anyone can access it without an account and login.
Notes:
- Manually assigned users can be easily deleted from the participants list with the "bin" icon next to them. If you cannot find a bin icon, it means the user is coming from SITS - and needs to be unenrolled there.
- The role of a user can be changed later in the Participants list with the "pen" icon next to his name.
Course access by students
1. Is the course visible for students?

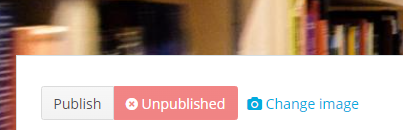
If the course name is displayed with gray color, or the "course status" is set to "Unpublished" at the course header, then students can not see it (it will not appear for them on their course lists and folders regardless of their rights.)
You can easily change this setting if you change the "Course status" to "Published". Alternatively you can edit the "course settings" at the administration block, and select "publish" for visibility.
No SITS connection: If the course is synchronized to SITS, then students will be automatically enrolled in this course when they log in to Moodle if they are registered in SITS, but they will not be able to access the course if it is not visible. It the course is not synchronized, but it should be, ask for support (acsg@ceu.edu)
2. Can students enroll in the course?
The default option is NO, students automatically appear on the courses if they register in SITS (the SITS sync is automatically enabled if possible).
SITS sync: If the course is synchronized to SITS, then students will be automatically enrolled in this course when they log in to Moodle if they are registered in SITS, but they will not be able to access the course if it is not visible. It the course is not synchronized, but it should be, ask for support (acsg@ceu.edu)
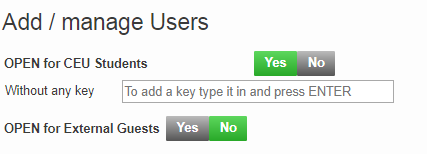
Open for CEU students: enables students to enroll in courses themselves (no need to be registered in SITS). If SITS sync is not enabled for any reason, you should enable this, otherwise this is not necessary.If an enrollment key is specified, any CEU user attempting to enroll in the course will be required to supply the key. This key has nothing to do with the official enrollment to a course (done in SITS).How to give access to readings for non-CEU users (Guests)
If the external users only need to check out course materials but do not need to interact with it (upload files, use forums, and assignments), then you can enable Guest access to allow this.
If the external users need to interact with a course you need to create them manually first and add them to the course.
Guest access
You should be really careful with this setting, especially if you have uploaded copyrighted materials for your students’ use. If you allow Guests (outside the CEU community) to access your course without a password (key), you will make the course public, and anyone will be able to access it.
You can still protect the course with a guest password (this key is necessary only for guests, not for CEU students!). Guests will be able to log in and see all (published) materials in your course.
They will be able to see activities, like forums (and forum posts) and assignments but will not be able to use them.
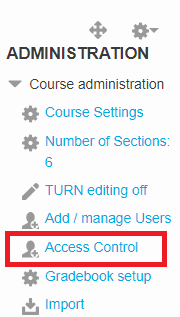
 Select Access Control in the administration menu to the top right.
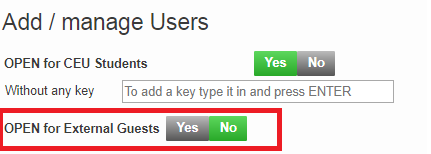 | You just need to change the "Open for external Guests" setting to "Yes". A Guest key will be set automatically under the button which can be changed.
Guests will be able to visit the site, "log in as a guest" then provide this password to reach your course. If you would like to make the course public, you can delete the key and press ENTER.
|
|---|
External accounts - for users who will not get a CEU account
Create external users in Moodle
If you never have done this, you need to ask for user creation rights.
Please note, that the Compliance with data protection rules (including the applicable laws) is the responsibility of all Members of CEU Community who process personal data (who initiated the creation of external accounts in Moodle). Make sure, that the users gave consent to the storage, management, and processing of their personal data. Make sure that personal data is kept only for the period that is required to fulfill the purposes it has been collected for. You need to ask for the deletion of the accounts if these are no longer needed.
The full Data Protection Policy of CEU is available here: https://documents.ceu.edu/documents/p-1805
Two methods are available for the user creation:I. Upload the new users with a CSV file
- The accounts are created automatically and immediately
- Emails are sent to the new users
- Email addresses, and names are needed in an excel (CSV) file
- It is more complicated to create the file correctly, but it is easier to handle a large amount of users
- An Invitation is created, the users need to register to get accounts
- You can decide if you want the system to send an automatic email or you can invite the users yourself
- Only email addresses are needed
- It is really easy to invite the users, but large amount of users are harder to handle
How to manage multi-group or online / offline courses?
When a course is listed in SITS as a double-entry (either Group 1 and 2 or online/offline), we have two options in Moodle.
Either use a separate course for both or just use one shared course. Which solution is better? It depends on the quantity of the identical/different content in the courses usually.
1. List both courses as separate entries
If some of the content is the same between the courses it is recommended to create this common content in one of the courses, then open the empty course, and import this in to avoid double work. (Note: if you do it multiple times, make sure, that you select only the new content, as you may create duplicates).
How to copy content from a previous course? (Import)
After this is done, you can add different content to each course individually.
2. Use only one Moodle course
a) Request merging the courses in Moodle (this is needed for the SITS sync)
b) Optionally set up groups in the course
The Groups feature allows you to divide the students in your course into different groups to easily separate them. Students can use Moodle activities as members of these groups afterward, allowing them to work together closely.
- You can change forums into group forums - allowing you to communicate with the members of each group separately.
- You can restrict activities/resources to be available/visible for only members of one group, not the other.
How to set up and use Groups in a course?
Copy selected contents between courses - Sharing cart and Mass actions block
If you need to copy selected contents into a course, which is not empty, you can do this multiple ways.
Sharing cart
Note: if you would like to copy into an empty course, and/or you need to copy the section summaries as well, use the simpler core function, import.
1. You can use "sharing cart" to save contents from a course which you can add to (multiple) different courses.
a) Open the course where the contents are located.
b) Turn![]() on.
on.
c) If not done already, add the "sharing cart" block to the course.
Open the block drawer (if necessary) 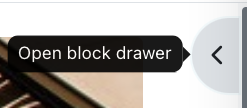 at the top right, if it is closed
Click on![]()
Select sharing cart from the popup. The block will be created at the bottom of the block list, so you may need to scroll down it to find it.)
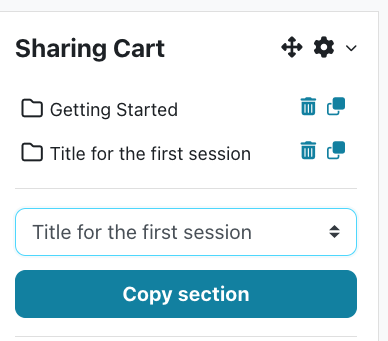
If you would like to copy whole topics, select it from the block.
Open the dropdown menu, select the title of the section and click "copy section".
e) Now you have the necessary contents saved, you can go to the "target" course, where you would like to copy.
You need the add the block there as well.
Click on the "copy to course" icon next to the item you would like to copy.
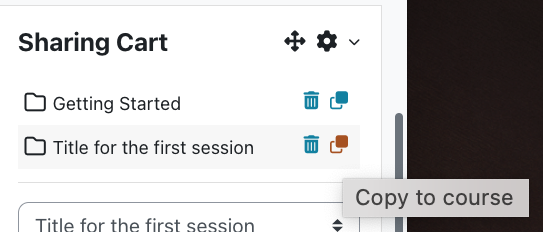
Select the place where you would like to copy -and you are done.
Short step by step video:
https://www.youtube.com/watch?v=K7r7wZc9Th8&ab_channel=Unbound-ED
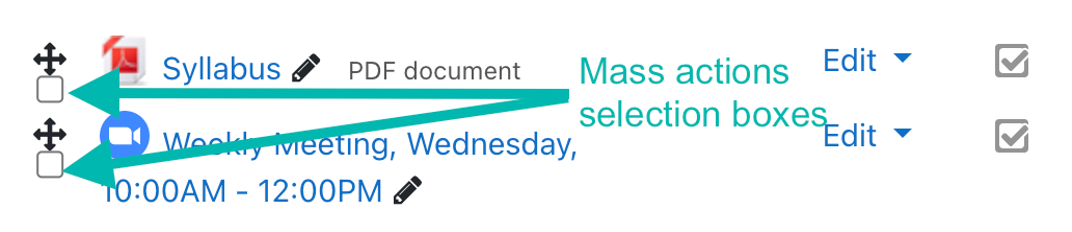
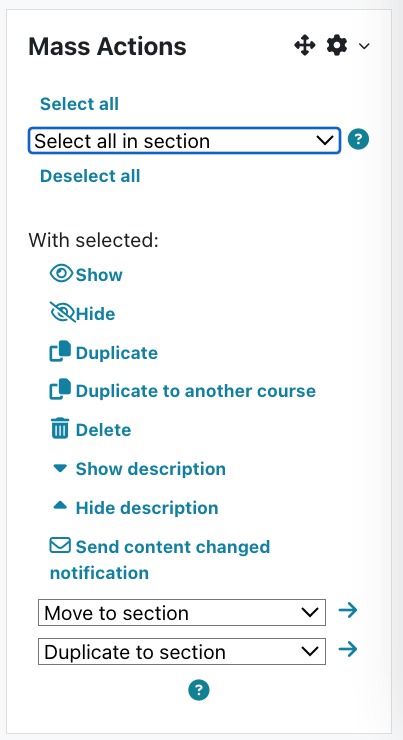
Mass actions
Basic Course Editing
After you log in and visit your course, always start with TURN EDIT mode ON (top right corner). Use the appearing icons and menus to add, change, move, edit content.
- You can simply drag and drop files into the course from your computer (or pictures, selected text from a word file, etc.)
How to upload readings/materials? - Add text to the course page with section summaries and labels
How should I add text to the Course? - Add activities to the course - like assignments
- Move / edit existing contents
- Visibility of Course Contents (readings, sections)
- How to communicate with students?
Other basic resources
- Course example: Check out how a basic course should look like
Most of the time, "normal" courses are structured by sessions/weeks (so you put materials for the first session into the first topic, and so on). - Full course editing FAQ
How to upload readings/materials?
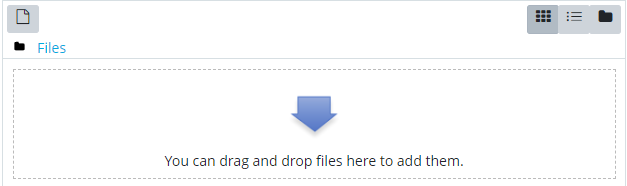
1. The most convenient way to upload files is the drag and drop method.
Start with TURN EDIT mode ON ( click on the button at the top right corner of the course header)
After this, you will be able to drag and drop files from your computer into your course.
Important note:
Be mindful of content that you upload to Moodle and make sure you have the rights to share the content. If you have questions about a specific material to share, contact the CEU library.
Detailed help about this:
https://ceu.libguides.com/moodle
If you experience any problems:
- Make sure that you are using an up-to-date browser: Chrome Firefox , Safari (IE is not supported anymore)
- The max. file size of any file uploaded is 50 Mb by default (you can change this at the "course settings").
- Make sure that the Editing is enabled (Edit mode)
- Check if your internet access is stable. Uploading large files can be really slow compared to browsing pages, so Wifi access can cause problems here.
2. Alternatively you can use the menu to upload a file (but it takes more time)
Select the "Add an activity or resource" link at the appropriate section.
Select " Single File" from the resources tab
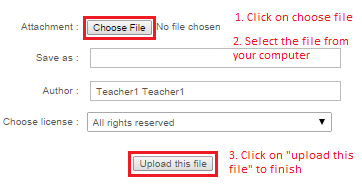
Fill in the "name" field, then select the upload icon > Choose a file > Select the file on your computer and click the “Upload this file” button and save.

3. Folders
A folder allows a teacher to display several readings together. With the drag and drop method, you have to Zip the files on your computer, and drag the Zip files in or use the Add an activity or resource menu, select "multiple files", fill in the name field, and drag or add the files one by one before you save. (Add an activity or resource > folder)
4. Upload limit
Generally
the largest file you can upload is 50MBs. If necessary, you can change this
limit to 500MBs at the "course settings" menu in the administration.
Help
How should I add text to the Course?
You can do this multiple ways. (do not forget to "Turn edit mode on" at the top right)
1. Drag and Drop
You can use the same Drag and Drop method, as with the file upload. Select the text, hold the left mouse button, and move the cursor to the appropriate section of your course. You will see a box with the “add text here” appear. Release, and select “Insert as a label” and the text will appear on the page.
2. Use the menu/icons in Moodle
All of the options below use the Moodle text editor.
a) Summaries
The very top of your course (the General section) and every topic or week contains a summary. This is a default label which allows you to place brief information about the specific topic or week. It can be an introduction to the unit of study or a short summary of the weekly plan. Activities and resources are listed below this section. More information
You can start editing with the "Edit section" link. It is located in the 3 dot menu at the top of the section.
b) Label
Labels serve as "spacers" between resources and activities, for example you can use a label to add the Text "Required readings" before a set of PDF files. 
You can open the activity chooser with the menu and select Text and media area - (Label). Type in the text and save.
After creation, you can move the label to the appropriate place with the Move ![]() icon above it.
icon above it.
Click and drag the label. As you drag, Moodle will dim the items under the item you are dragging. Release the mouse to drop the item into a new location.
More information about labels
c) Page
The major difference between this resource and the label is that labels are always created on the main page of the course but web pages will appear as a link on the main page (and will be opened in a new window as a subpage). The creation process is the same, just select "PAGE" from the Activity chooser.
d) Accordion (collapsed text) resource - A new resource is available which provides a new way to add text into the course in accordion-style menus. Create an accordion (just add the title and save), and you will be able to add the contents at the second form: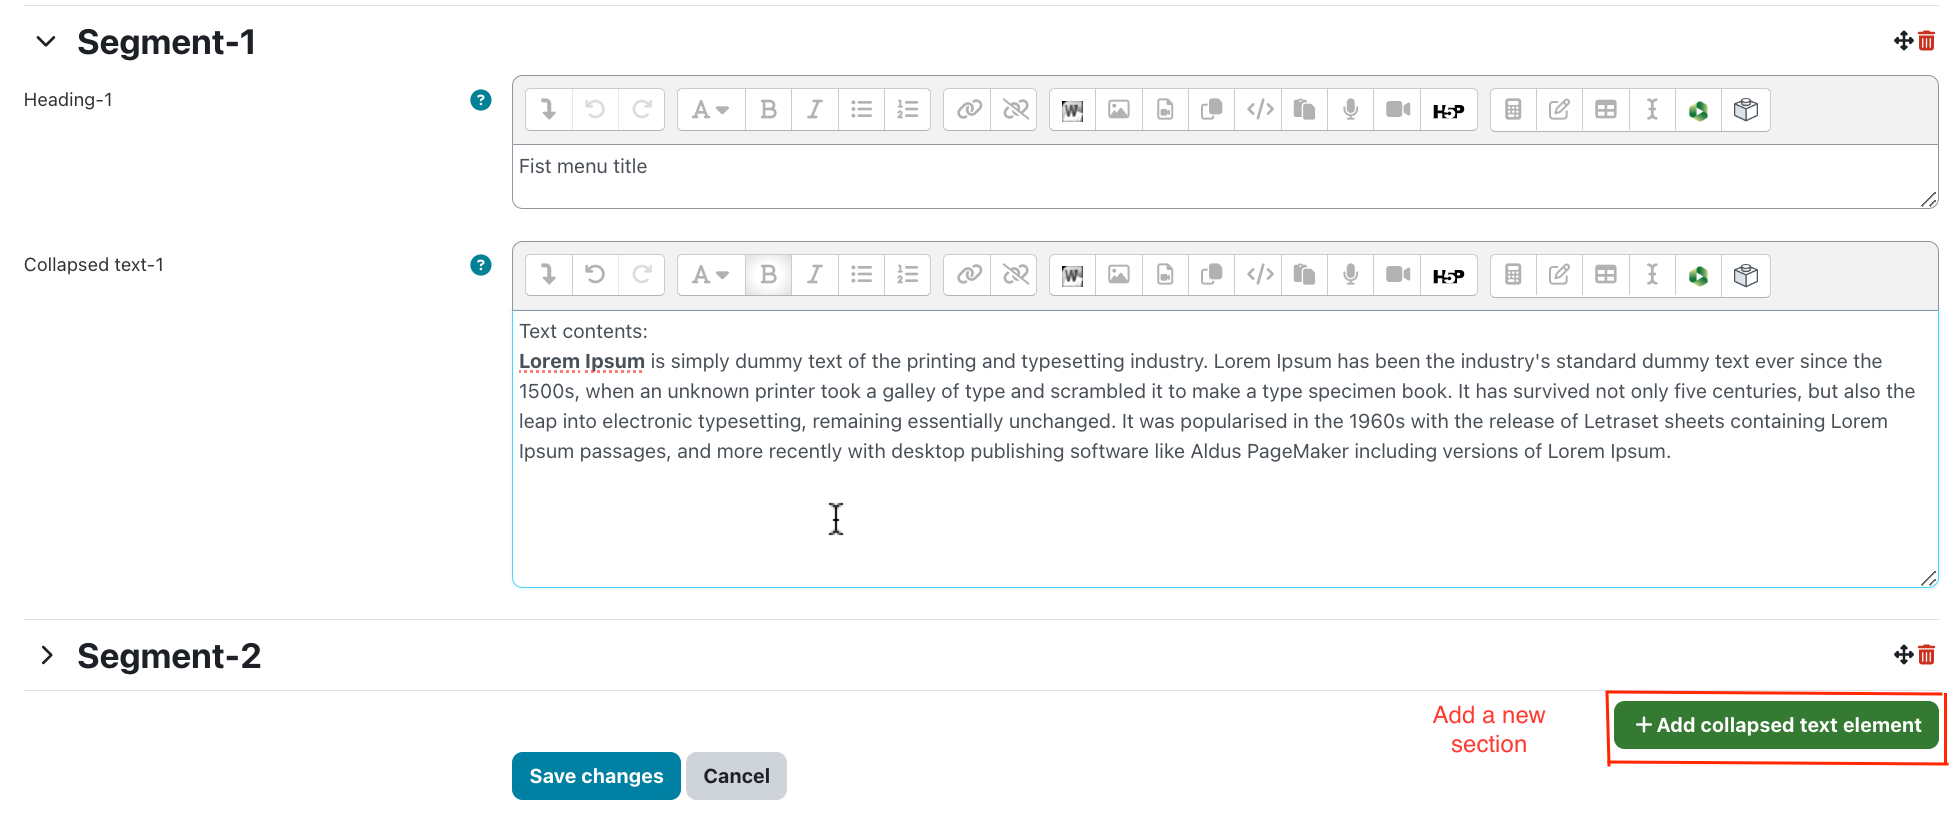
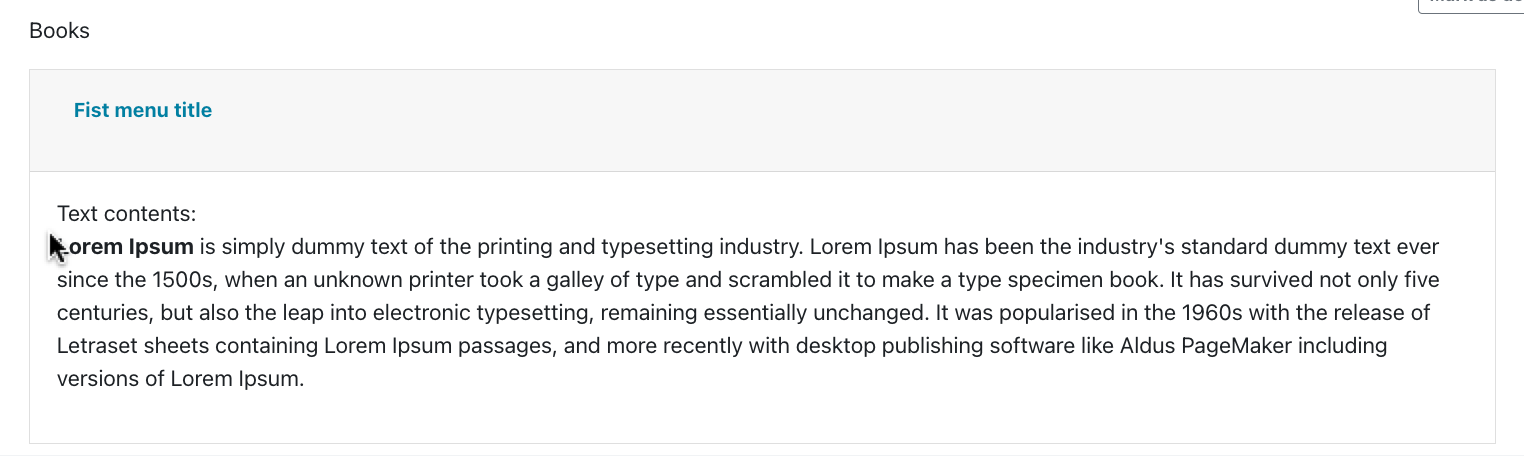
The accordion will look like this closed:

And opened:
3. Important note about MS Word
Most of the time when you will copy / paste some text from a MS Word document to Moodle it will be done without any problems (label or page, etc.), as the editor try to clean the text.
But it is recommended to be cautious as sometimes a few formatting problems can happen as these documents have "hidden" formatting (and you copy this as well without knowing it).
If your MS word document have special formatting, tables, this is more likely. But minor changes, like paragraphs, line spacing change regularly.
What can you do to prevent any possible problems?
a) Paste the text to Wordpad or Notepad first, and copy to Moodle from these editors
b) Use the "Paste special" icon in the processor before pasting to clean the contents.

Note: Some browsers does not allow you to use the "Paste" command with your mouse. Use the CTRL+V key combination instead.
The Moodle text editor and accessibility
The Moodle text editor is what you get any time you are entering content in Moodle. This is the same for both students and teachers, the editor is used for section headings, pages, description of an activity, forum posts, and writing an answer to a quiz question.The editor auto saves every minute, so if you close the window by accident, or some technical error occurs, most of your work will not be lost.
If you are modifying existing content, and something goes wrong, most of the time the best practice is using the undo button.
What can you do with this editor?
Drag and Drop
You can drag and drop most content from your computer into the editor box. The most useful content to drag in are Document files or images.Copy / Paste
You can also copy/paste text into the box, but you need to be careful with this.
- If you paste in formatted text (from MS word for example), it may break the formatting. To prevent this, either use the "Paste special"
 icon ( Details ) or highlight the copied text and clear the formatting
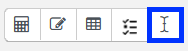
- You should not paste in links from a different course. If you do this, the links will point to the original course, and students will not have access to the linked content. Use import instead.
Formatting
Many of these icons and functions should be familiar to anyone who uses a word processor. You need to highlight the text you would like to change, and select the relevant icon to make the text Bold, change the color, etc.
Many of the icons are rarely used, but can be useful for specific cases, like the Table, or Equation editor, we will not cover these here, you can find details at Moodle.org.
Other important functions
Please see the icons for these below at the image.
1. Add a link / upload a file
Highlight the text where you would like to put the link, and click on the icon ![]() . A popup window will appear. Type in the link or click on Browse repositories and upload a file from your computer and save. Most of the time it is recommended to tick the "open in new window" box.
. A popup window will appear. Type in the link or click on Browse repositories and upload a file from your computer and save. Most of the time it is recommended to tick the "open in new window" box.
2. Change into HTML mode (embed content) ![]()
This can be useful, if you are an expert in HTML to edit the source of your content, or more commonly to put some external content embedded into the course - for example a youtube video. Open the external content in an another window, copy the embed link, then come back to the Moodle editor. Change into HTML mode and paste the code in and save.
- Keep text formatting simple and consistent across your course. Start with plain font in the default size or larger, and use bold and italics sparingly. Left-aligned text is generally most readable.
- Avoid light-colored text on a white background. Ensure that there is good color contrast between the text and background.
- Use the hyperlink button in the toolbar to link text rather than pasting the full URL. Use meaningful text (e.g., “CEU homepage”) rather than “http://www.ceu.edu/...”. This reduces visual clutter and helps screen reader users.
- Add Alt text when uploading images- this is a textual description of an image for participants who cannot see it. For example, if you post a diagram of a key concept, but sure to describe textually the most important features of the diagram in the Alt text box.
Use headings and lists appropriately. Proper heading structure and bulleted or numbered lists improve navigation for all students, especially those using screen readers.
-
Avoid using color alone to convey meaning. Supplement color coding with text labels or patterns so students who are colorblind or print materials in grayscale can still access the information.
-
Caption and provide transcripts for media. Videos should have captions and transcripts to ensure accessibility for students who are deaf or hard of hearing.
Learning Components and Collapsed Contents in the Editor
There are multiple types available. Most of them just provide a colorful banner, and stick out. These are great to use for highlighting important content.
For example Course welcome, Learning outcomes, or Attention
Using too many of them on one page is not recommended as it can clutter a page visually and also can cause some visual bugs.
Be careful with deleting empty lines before / after them, they may be part of the component and could break them. If it happens, you can just easily undo it with the undo icon.
Types available
How to add one?
Just click on the icon, select the component and modify the placeholder text with your own.
Collapsed content - special learning component
With this component you can hide long chunks of text which will appear only when you click on the Show more /less link - you could see it in action on this page. Click on the link to see how it works.Move / edit existing contents
You will see icons next to each resource and section in editing mode.
Modify resources / activities:
Click on the 3 dots at the left to open the “EDIT” menu.
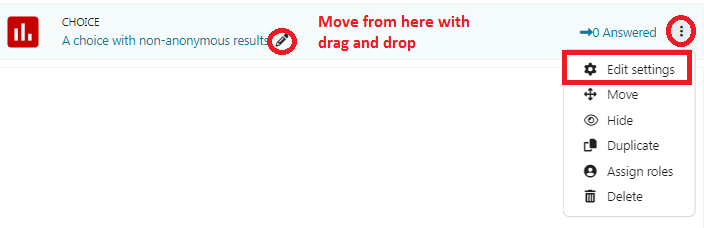
 Edit settings will give you back the form you filled out at creation and you can edit it.
Move - instead of drag and drop, you can select a new place for an item. Useful to move between sections.
Hide the activity from students (unpublish), than you can "show" publish it back later if you wish
If the section where the activity is located is hidden, you will see more options instead of hide/show. Make available, but do not show on course page. It means that the students will not see this resource, but if you link to it somewhere else, they will be able to access it.
Duplicate: Create a copy of the item (it can be useful if you would like to have an activity each section, this way you just need to move and modify what is different.
Assign roles: advanced functionality, not recommended unless you know what you are doing
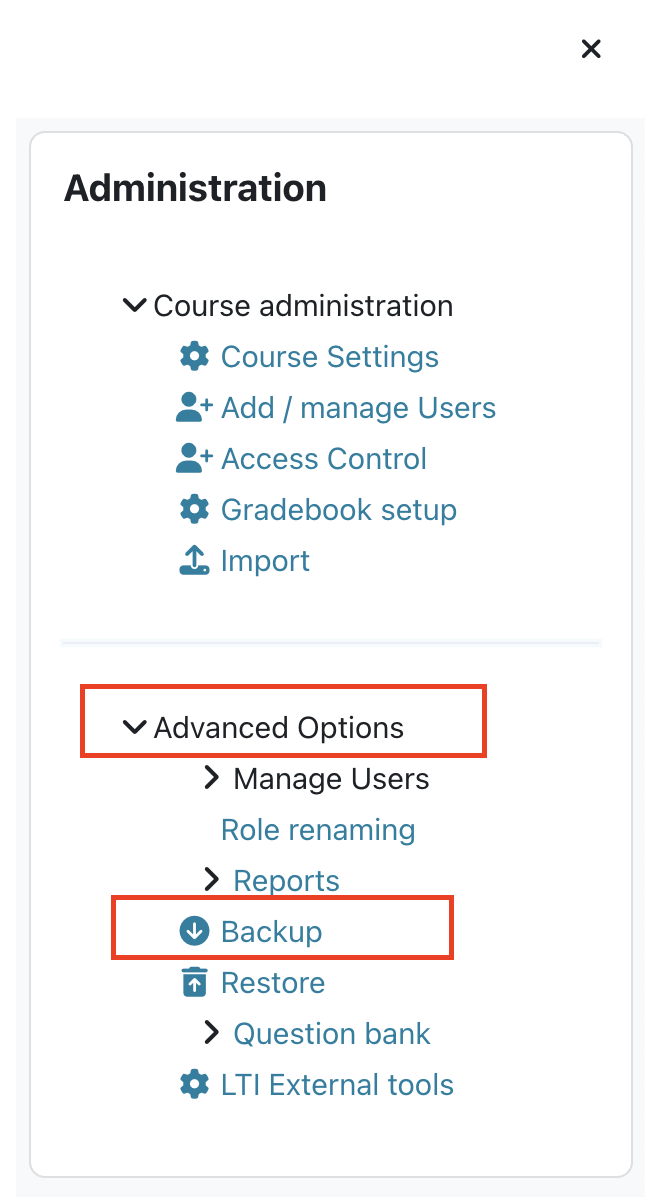
Delete: if you delete something by accident, you will find it at the recycle bin (in the administration > advanced block.
Move resources / activities with drag and drop:
Go with the cursor on top of an activity, a big cross icon will appear. Click and drag the Cross icon. As you drag, Moodle will dim the items under the item you are dragging. Release the mouse to drop the item into a new location.
=> How to move course sections
NEW: You can use Bulk editing if you would like do the same operation with multiple items.

Select the resources in the course you would like to interact with the small boxes at the left.
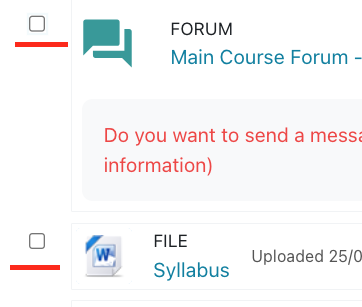
You can hide / show, move, duplicate, and delete them at the bottom with one click.
If you select a resource / or a topic, you will have the option to "select all" as well.
Be careful with this, as this is intended to select all resources / all topics in the course, so make sure that you do the mass action only with the intended content.
Short video: https://www.youtube.com/watch?v=xtA34FjcN2w
How to Rearrange (change the order of) whole sections?
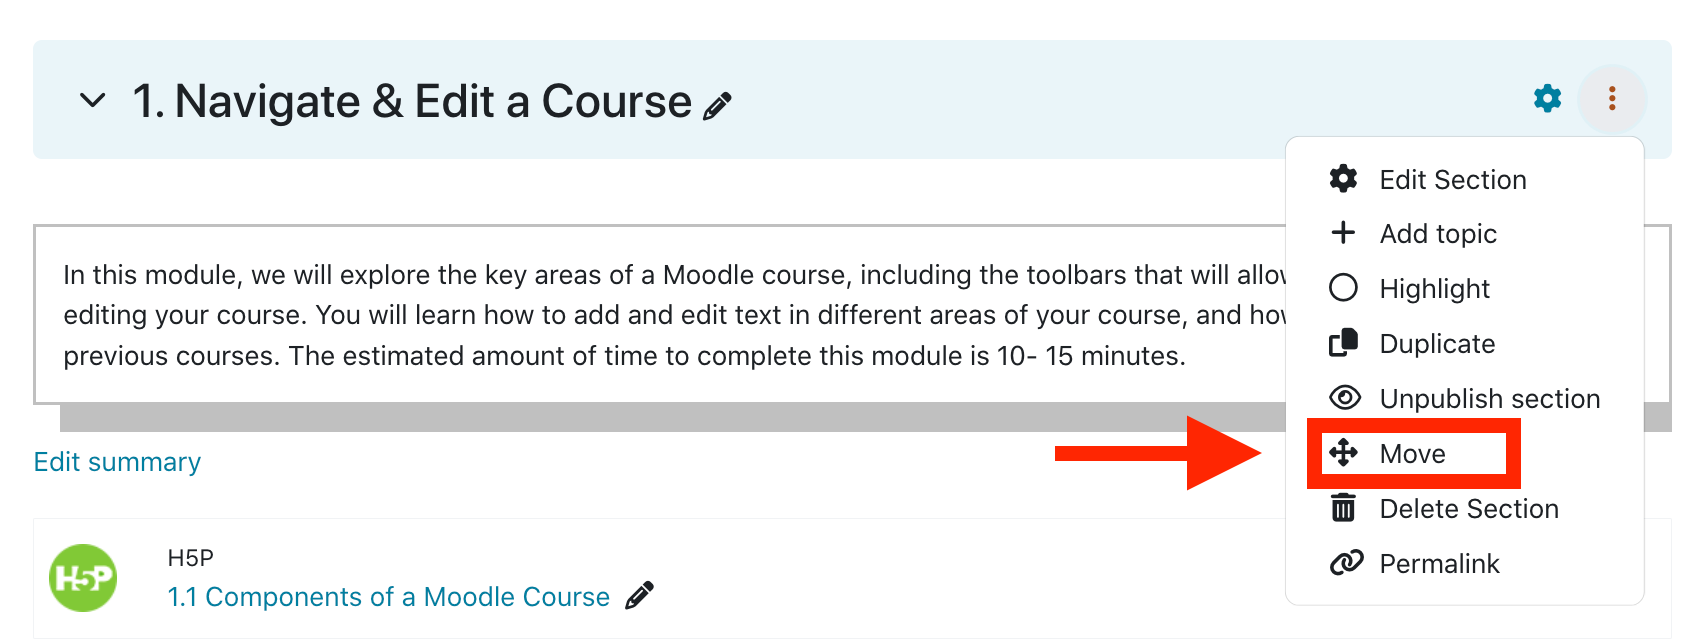
There are three ways to move or reorder course sections and individual items (for all you need to be in editing mode).
Option 1: Select the three vertical dots next to a course section or item. Select Move from the drop-down menu. This will open a pop-up box that allows you to move the item to the desired location.
Option 2: Open the course index at the left, and you can change the order of sections with the drag and drop method also. The icon you see is either a "hand" icon (above text), or a crosshairs icon.
Important: this function only works if you are at the main view of the course (it will not work in single section mode, or if you are viewing an activity).
As you drag the title, you will see a line where the new position will be.
If you wish to move multiple items at the same time, you can use the bulk editing function.
Important Note: If you did not change the default section names (section 1,2,3, etc.), then when you swap the sections, the section names will change as well (as it represents their position in the course). Do not be confused by this, the contents also travelled with the title.
How to Add or Delete Course Sections
While a default course is set to 12 sections to correspond with the CEU semester, you can add and delete course sections as desired. (Deleting empty sections is not necessary, as these are not shown to students.)
With editing mode on, select the three dots next to an existing course section. To add a course section directly below it, select "Add Section." 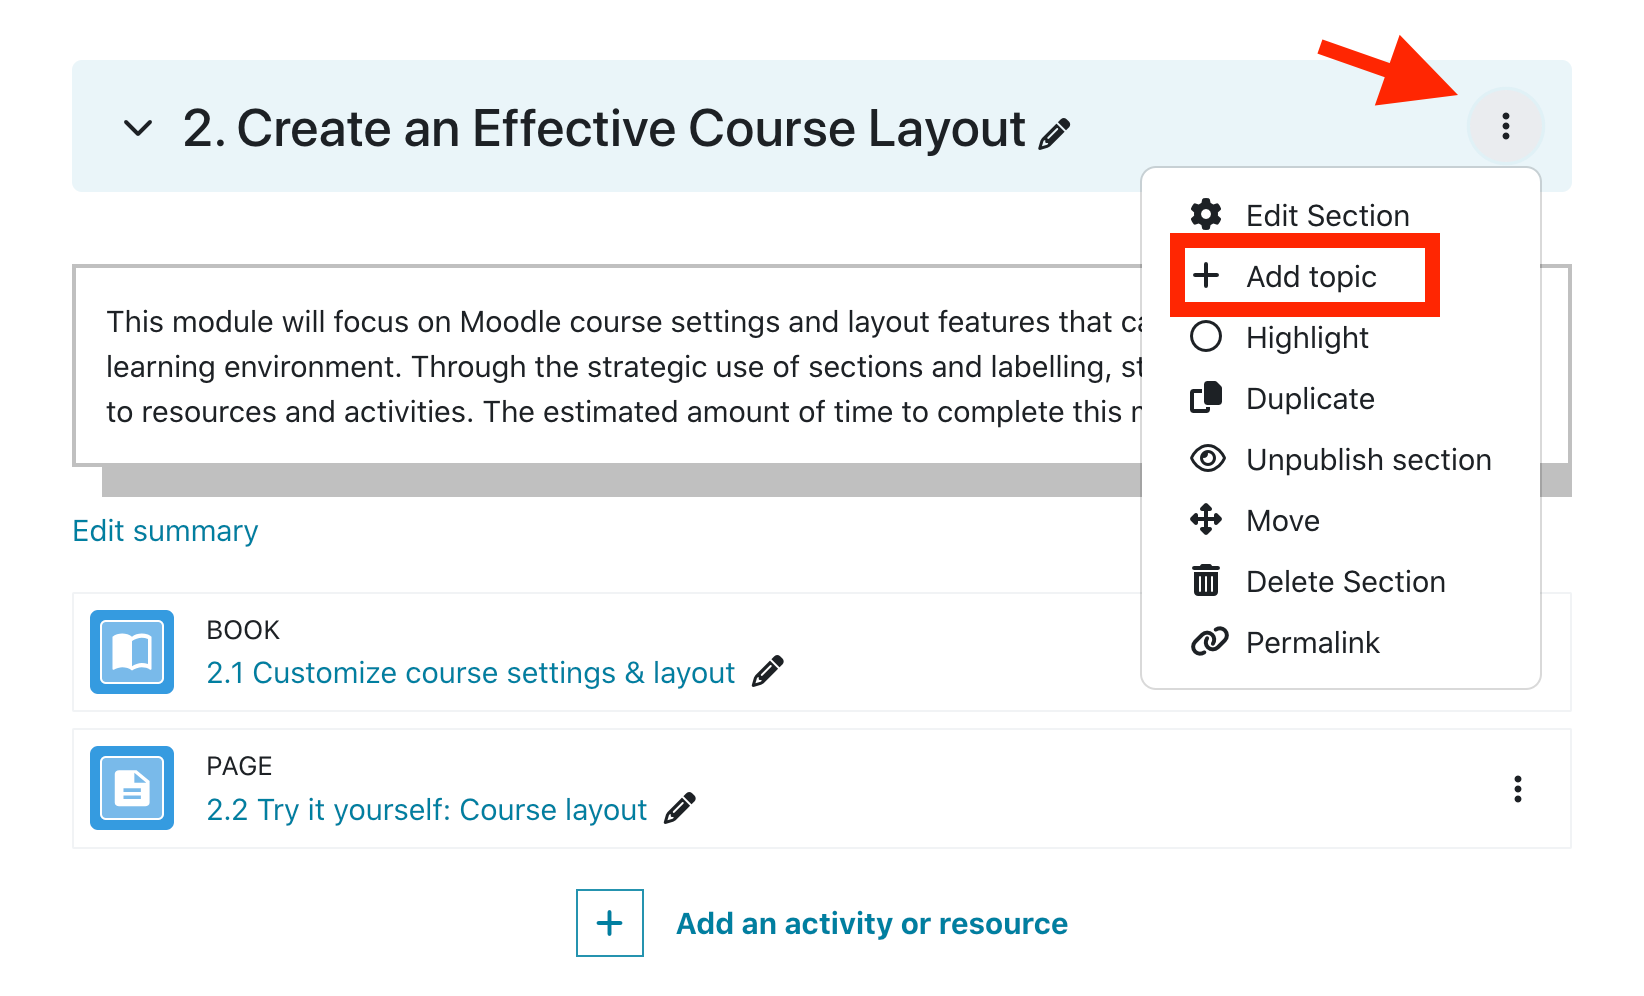
To delete an empty course section, select "Delete Section." 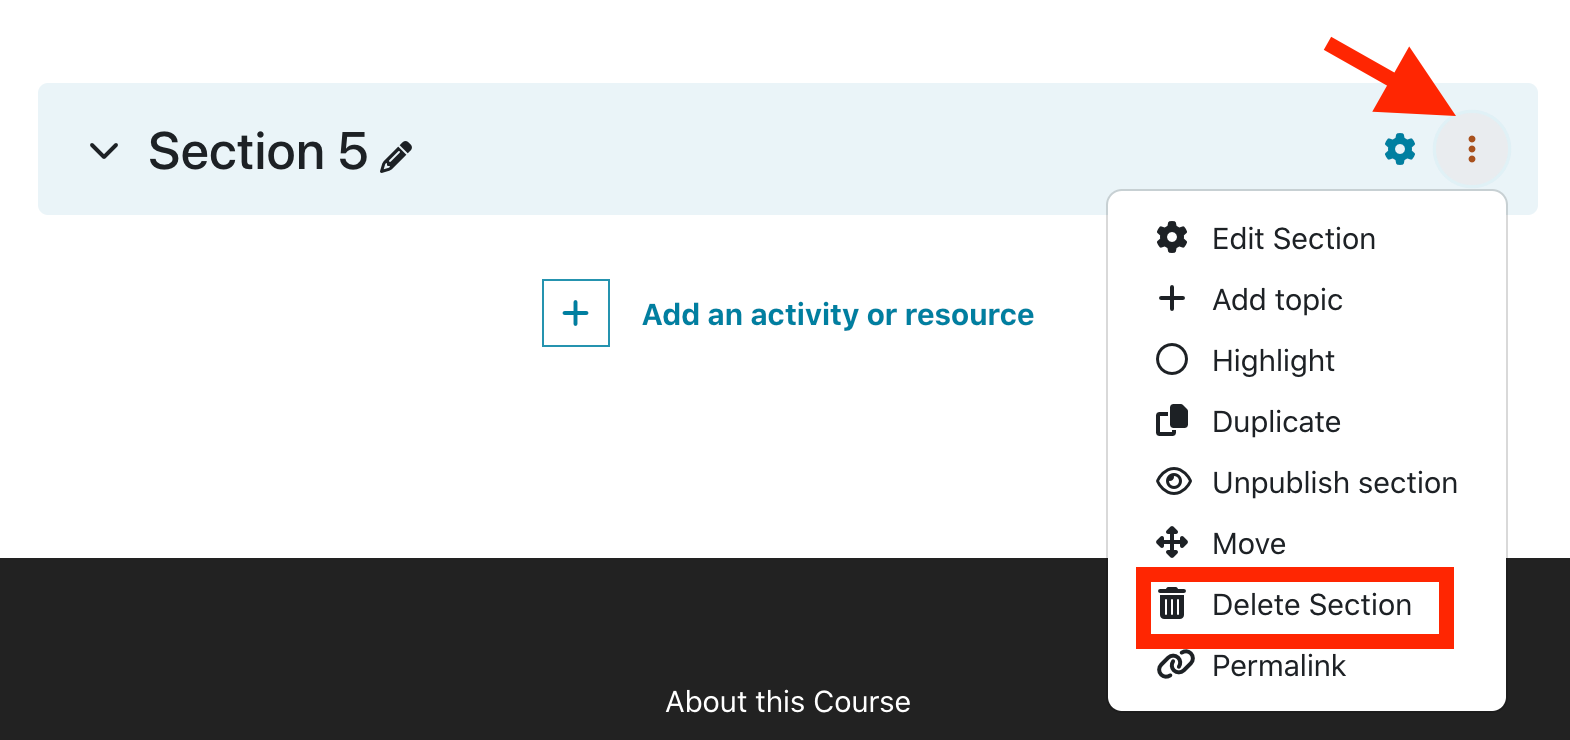
Some options that may also be useful in this menu are
- "Duplicate," if you wish you copy the format of an existing course section. Some instructors find it helpful to develop a template course section which they duplicate and then add content.
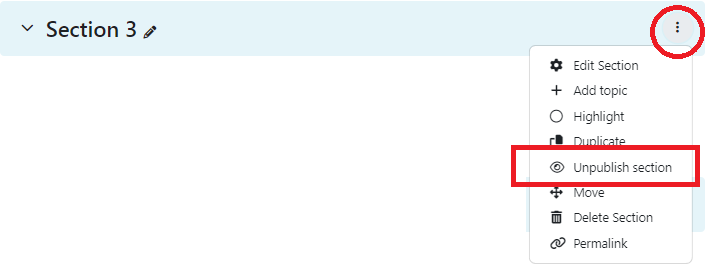
- "Unpublish section," if you wish to hide a particular section from students until it is ready.
Bulk Editing
If you wish to delete or hide multiple sections at once, you can use the bulk edit feature. Select "Bulk edit" from the top of your course, and then select the check box next to the course sections you wish you delete or hide.
Visibility of Course Contents (readings, sections)
1. Basic Hide / Show
You can hide entire topics or just single resources from the students. As with the course links, the gray color always means hidden content.
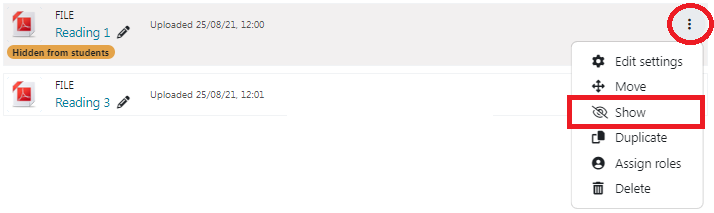
a) You can hide / show individual resources and activities if you click on the 3 dots > hide / show next to them. The hidden resource will have a gray background indicating it is not visible for students.
b) To hide a topic, click on the 3 dots > unpublish section next to the topic title. The background of the topic become gray, and NO content will be visible for students regardless of the individual settings of the resources in the Topic.
Clicking on Edit section > publish section makes the topic visible.
c) The hierarchy is really important, as long as a topic is hidden the individual resources are not visible for students.
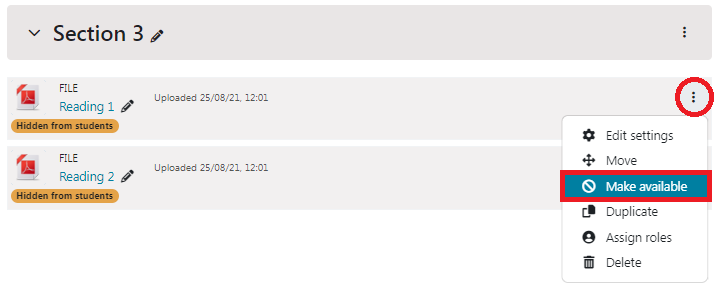
If you open the edit menu with the 3 dots inside a hidden topic, you will have the option to "make available" a hidden resource. It will still not be visible for the students, but you will be able to link this resource in other parts of the course, and the resource will be available for the students with this link (it can be useful to create tight course structures, or use a resource multiple places in the course).
d) Note: If you collapse a section with either the left > icons or with the "collapse all" at the first section, it will only change your view, students will still see all information in these sections.
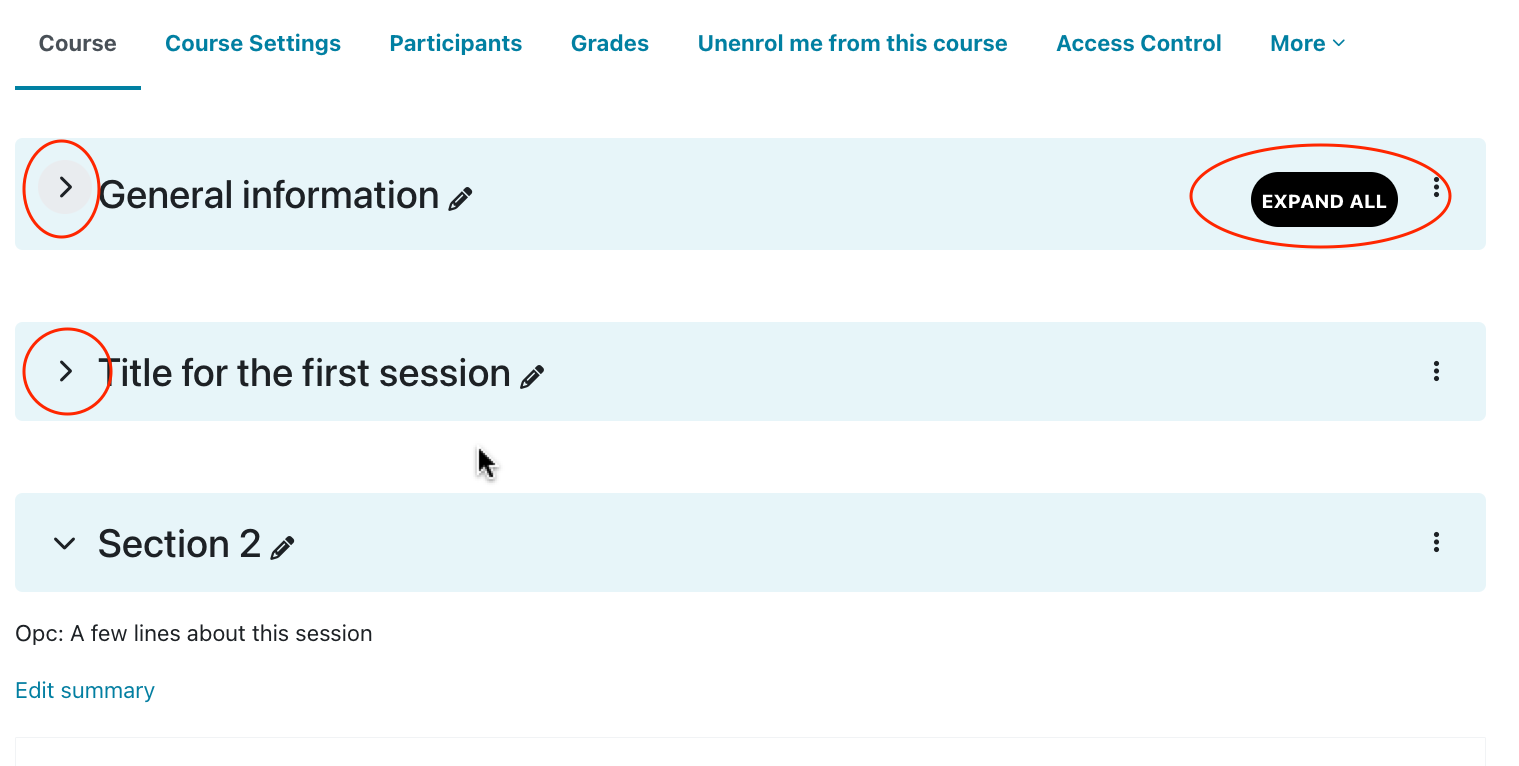
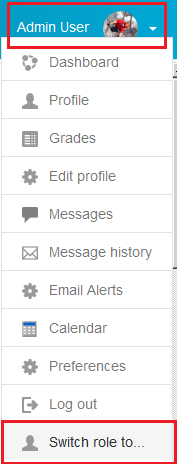
If you are uncertain about students view, you can always check if you click on "switch role to > student" at the top menu (click on your profile picture to access this.
2. Advanced restrictions
You can restrict resources with "Restriction" options or with group settings. These options make it possible to hide the contents from only a selected group of students or to make certain resources appear or disappear at a certain time.
These settings are more complicated to master, if you never used these, ask for assistance.
How to communicate with students?
There are multiple ways for communication in a Moodle Course.
1. If you post a discussion to a Main Course forum - send message to class (the former News forum), all participants of the course will receive the message in email. This forum is automatically created for each course. By default, it is placed in the top of the middle section and NEW* all course participants can add posts or reply to posts. Students and professors receive an email automatically with the message.
2. You can contact with one other user (student) with messaging - like an sms. (Participants link in the People block - Send message button on each user's page). It is not that convenient to find archive messages, so this method is not recommended for important messages.
Emails are sent to offline users only - and of course, you will not get your own messages in email.
|
1. Open the Participants link in the top left section of the navigation drawer 2. Tick the boxes next to the users you would like to send a message to 3. Choose "Send a message" 4. Write your message, preview and send it. |
 |
Message history: http://ceulearning.ceu.edu/message/index.php?viewing=recentconversations
3. Welcome message for enrolling students - new function in the redesigned "Access control" menu
If you enable this function in the course, the newly enrolling students will receive an automatic welcome message regardless of the method (manually assigned, SITS registration, self-enrolment). You can supplement the email template. This can be used for example during registration periods, if you send a message from the Main course forum, you can enable this function and copy the message here as well so late registering students gets the information as an email immediately.

How to change course header images?
All courses in Moodle get one random header image from the Vienna campus from 5 available (for departments with Budapest presence, from a mixed pool of Budapest and Vienna images).We can change the pool on a department level (please contact me for this) or the image individually at the courses.
How to change it in a course?
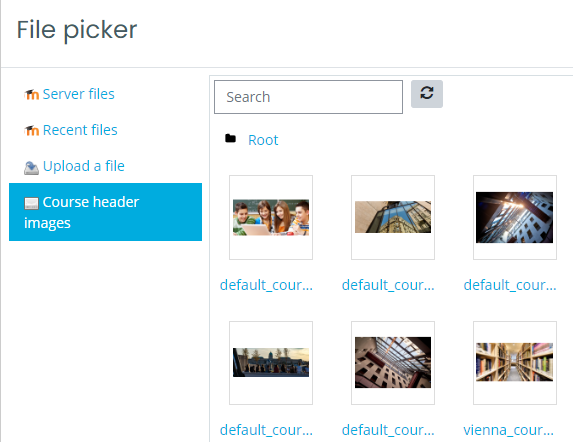
1. Click on the "change image" link below the image in the course.
2. Drag and drop the image into the box, or click on the box to select one preloaded image from the "course header images repository".
Recommended size 1200x500px.
NEW: This image will be used as a small thumbnail image on the dashboard of the students as well (otherwise the random header image is used there as well).
Further notes:
- If you drag and drop a Doc, Docx, PDF to the box - will be used as a summary file
- If you upload a txt file (the contents does not matter), it will not be displayed, but the course will not have a course header image.
Download course content (and syllabus)
A) Print the course as PDF
If you only need the list of course contents (the entire syllabus) offline, you can use your browser’s print function for this purpose.
The system automatically removes unnecessary blocks and navigation bars in the print view, making it much more readable and user-friendly.
Simply open the course (and make sure it is not in editing mode to avoid the extra icons), then use your browser’s built-in print option (File menu → Print or Ctrl+P). Select Save as PDF as the printer/destination, and the syllabus will be saved as a PDF file in your browser’s download folder.


C) Get the files uploaded
I. option: Download course content
You can enable this function at the "course settings" menu - you can find it at the top, under the "course visibility" options. This will enable students (and instructors) to download all course contents readings, text, activity descriptions in a single Zip file.
Details:
https://docs.moodle.org/310/en/Download_course_content
II. option: Download Materials block
The Download Materials block provides a way to download multiple files from a Moodle course at one time. You may choose to download files from a single section or from the entire course. If the block has been added to the course, it will be available to both instructors and students. However, students will only be able to download files that are not hidden from them in the course. This block is disabled by default, you need to add it to your course if you would like to enable it.
To Add the Download Materials Block to a Course:
1. Turn editing mode on in the top right-hand corner.
2. Select the "Add a block" link from the top of the blocks menu |
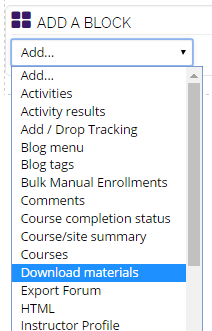
3. From the Add a Block dropdown menu, select the Download materials block option.
|
|---|---|
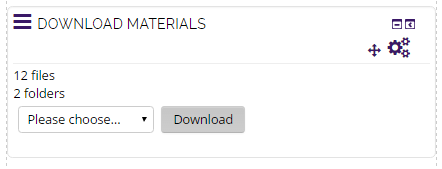
4. The Download Materials block should appear at the bottom right side.
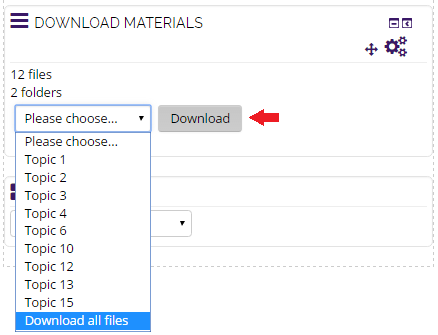
5. Use the drop down list to choose a single section or all files in a course. Click the Download button after you have made your selection.
6. You will now be prompted to save a .zip file to your computer.
7. Optional: If you do not want to enable students to download all materials with the block, delete it after use (edit > delete block)Create Activities (give tasks to students)
If you would like to give tasks for students, you can use the Activities in Moodle.
You can open the activity chooser with the menu and select activity you would like to add.
The most basic activities are really easy to create (you just need to fill in a Title, and a description, and for assignments a due date) and Save - but if you would like to use other options it is recommended to read the details.
The activity chooser provides details about these possibilities, you can check this chart to help you determine which activity is needed for the task at hand or just ask your question at (acsg@ceu.edu).
- With assignments, you do not have to search for submitted essays scattered in your mailbox. Students can upload them to Moodle and you can check, grade and comment on them in one place (submitted papers are not visible for other students).
If you enable Turnitin, an originality report will be created for all upload submissions as well.
Details : Create / Grade assignments
- The forum activity provides a place for asynchronous discussions for students and give the ability to share files with others in the course. The groups feature allows you to easily separate students in your course, allowing them to work together closely. Details:
Forums and Groups (PDF)
- The choice and feedback activity allow to create quick polls and to gather (anonym) information from students.
Details: Choices and Feedback (PDF)
Creating an assignment and settings
With assignments, you do not have to search for submitted essays scattered in your mailbox. Students can upload them to Moodle and you can check, grade and comment on them in one place (submitted papers are not visible for other students). If you enable Turnitin, an originality report will be created for all upload submissions as well.Creating an assignment
You can open the activity chooser with themenu and select assignment.
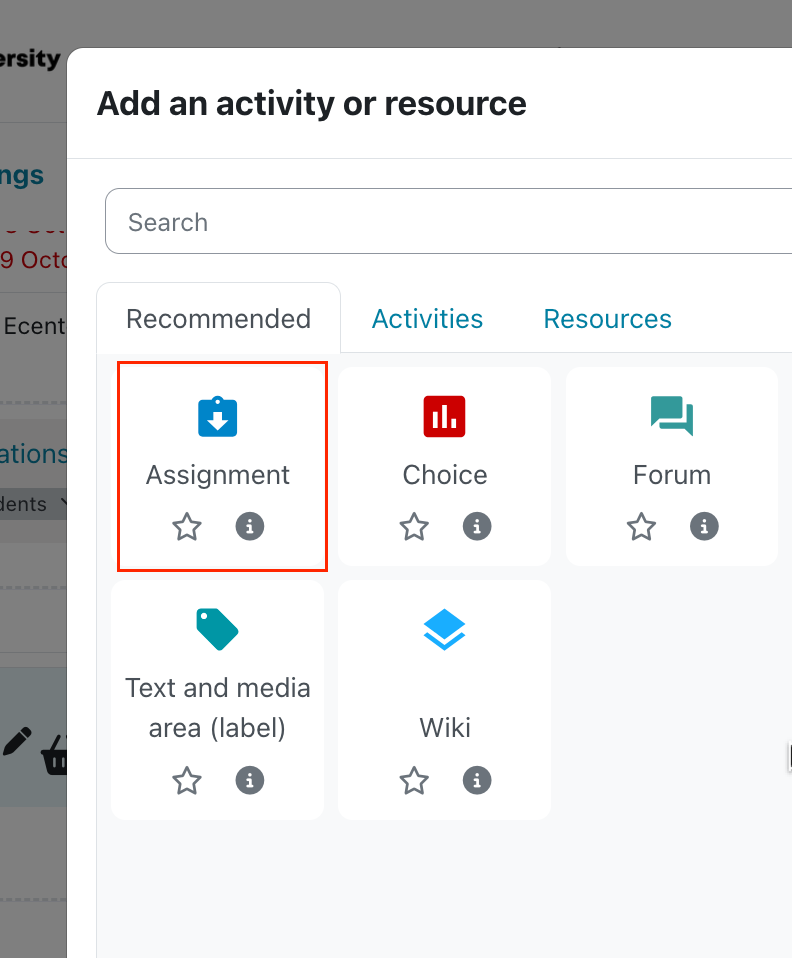
You just need to change the title, add a description, and a due date and Save - but if you would like to use other options it is recommended to read the details.
Due date is the most important setting. It is shown at students calendar and also notifications are sent to students by default 2 days before this as a reminder (new in 4.5).
Note: the default Moodle behaviour is changed for better user experience. Students can submit after the due date as well for the first time (as a late submission), but cannot modify. You can manually enable a student to modify later.
If the assignment does not have a due date, it may be useful to set a notification for yourself of student submissions and/or enable a submit button for students so they can mark their work finished. (It is not recommended to do this if a due date is set) See the settings below.
Optional settings which may be used for specific reasons are listed below. In general, do not change settings, unless you know what you would like to accomplish (especially settings not listed below). All available settings and more detail can be found in the Moodle docs.
- Allow submissions from: The students will not be able to start / submit their work before the first date (default – they can start immediately). This can be useful for a timed assignment (where students can start at the same time).
- Enable Turnitin - plagiarism detection - If you enable, reports will be created for submissions automatically. You can read more information here.
- Submission types (default: file submissions)
You can select more than one method (change the number of max. files), or deselect all.
- Online text format: can be used for students to write text directly in the Moodle text editor. This can be useful to see word count, enable students to link external content or to give feedback inline after submissions.
- Offline assignment: If you disable the file submission method (deselect all), you can create an “offline” assignment. Students do not need to provide anything online, but you can still provide them the description and deadline and mark them in Moodle.
- Restrict file type: You can ask for specific file types here, separated by semicolons. E.g. .docx, .pdf
- Grade: You can assign any point value to the work of individual students from 0 to 100. You can change the maximum to a lower value. Using scales are not recommended as it breaks the automatic final grade calculation. Moodle grades are not connected to SITS.
You can read more about Grading in here.
Advanced grading methods
These can be used instead of "simple direct grading". It is not recommended to use for most cases as this is super complicated to set up and pilot without issues. Rubrics / marking guide can be used for criteria-based assessment.
More information about advanced grading methods
- Anonymous submissions: Blind marking hides the identity of students to markers. Blind marking settings will be locked once a submission or grade has been made in relation to this assignment. If you use this option, you will need to “reveal student identities” after the marking is finished.
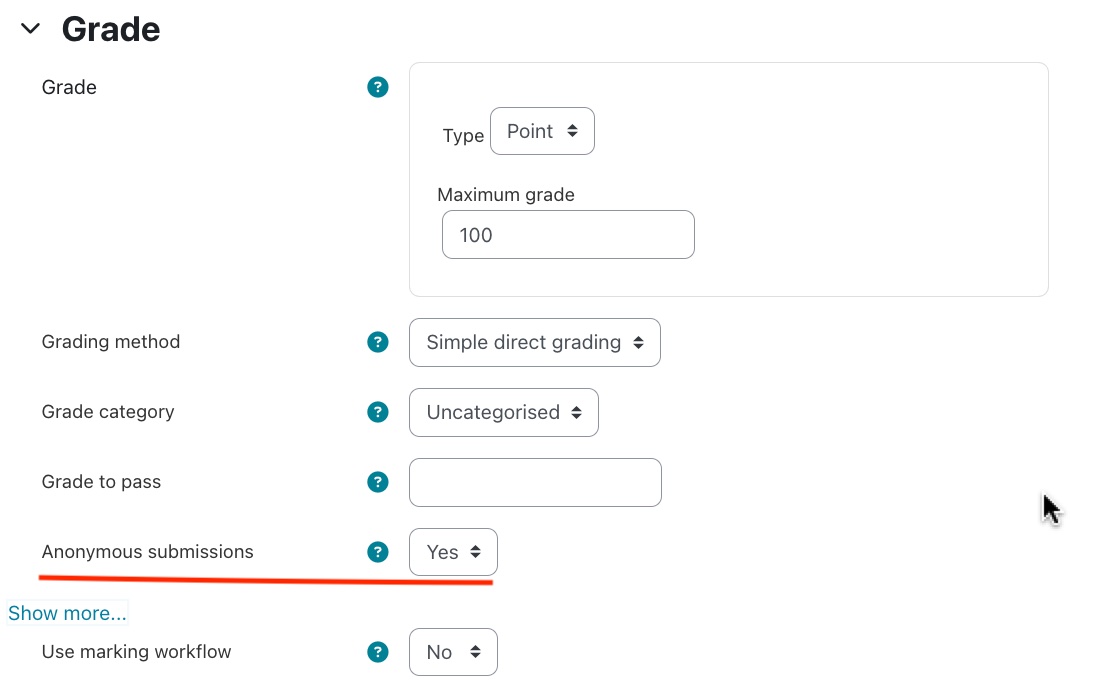
You can read more details here. - Use marking workflow: When set to Yes, teachers will be able to specify the stage they are at in their grading of individual assignments (as in the screenshot).
 One advantage of using marking workflow is that the grades can be hidden from students until they are set to 'Released', and the others can be useful if a paper will be marked by the cooperation of two or more markers. Note: Their own grades are immediately available for students by default if Marking workflow is not used.
 Shared (team submission) > Students submit as teams:
If you separate students for different activities into different groups in the course, you need to use "groupings" as well (under show more).
If you enable this,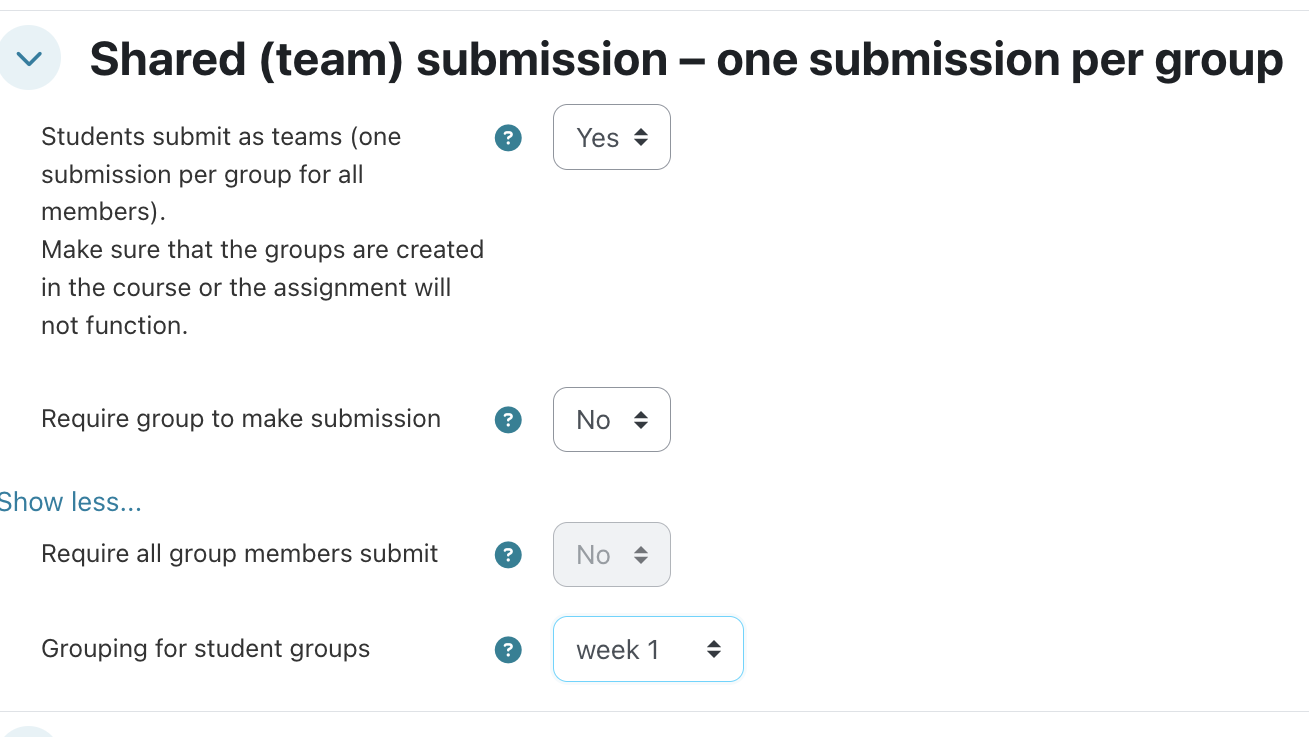 students will have a "shared dropbox" in the assignment, only one of them submits and all of them will see the feedback, share the grades.
Important: before you use this setting, set up the groups in the course, or ALL students will belong to one group and share the submission.
- Common module settings > group mode > separate groups
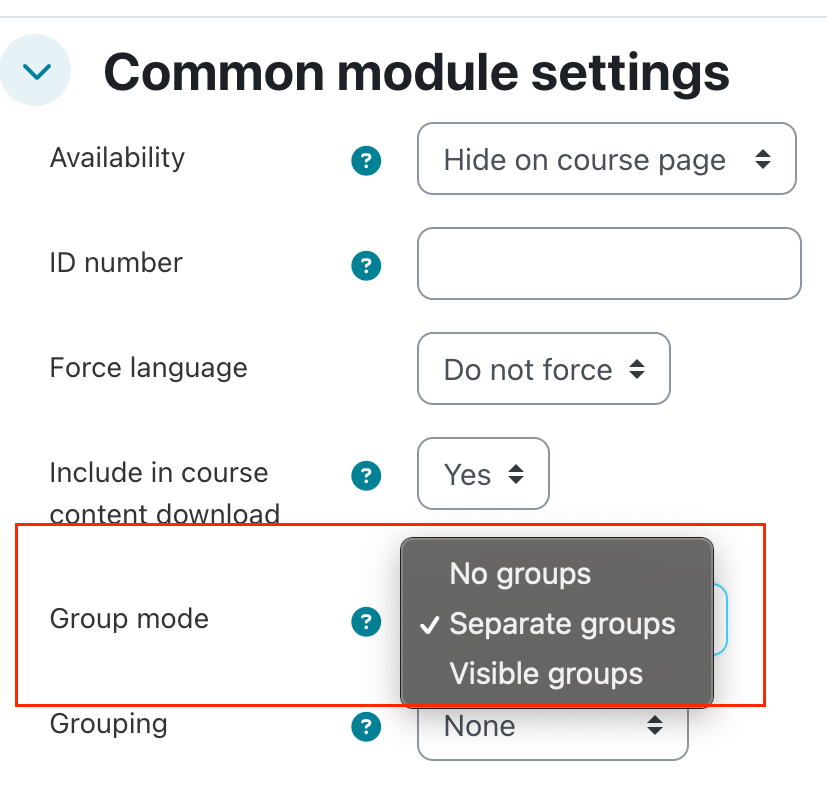 If you use this setting, students submit individually, but it will be possible to distribute students among teachers. For this you need to add the graders with "non-editing teacher" role to the course or change the permissions on the assignment for other teaching roles and assign the instructors and students in groups.
After this, the instructors will see only their own students. This may be useful for example for thesis supervisors.
Notifications - Students get an email notification after submission, and they get a reminder email two days before the due date. You can turn this reminder off at "Common module settings -> ID number, just include "noduesoon" and a number in this field.
- Restrict access: make the activity available for a selected set of students only. Details about this.
- Submission notifications:
Moodle allows teachers to receive notifications when students submit assignments, when they submit assignments late, or for both cases. This feature alerts graders about new submissions or reminds them to check assignments submitted after the due date. These options can be configured under the “Notifications” menu:
-
Notify graders about submissions – sends a notification for all submissions.
-
Notify graders about late submissions – sends a notification only for assignments submitted after the due date.
By default, students receive a notification when they submit an assignment and when it has been graded.
-
Grading and feedback
Assignment - Grading and Feedback
Grading and feedback
When you create a new assignment or activity in a course, Moodle will automatically create an entry in the gradebook.
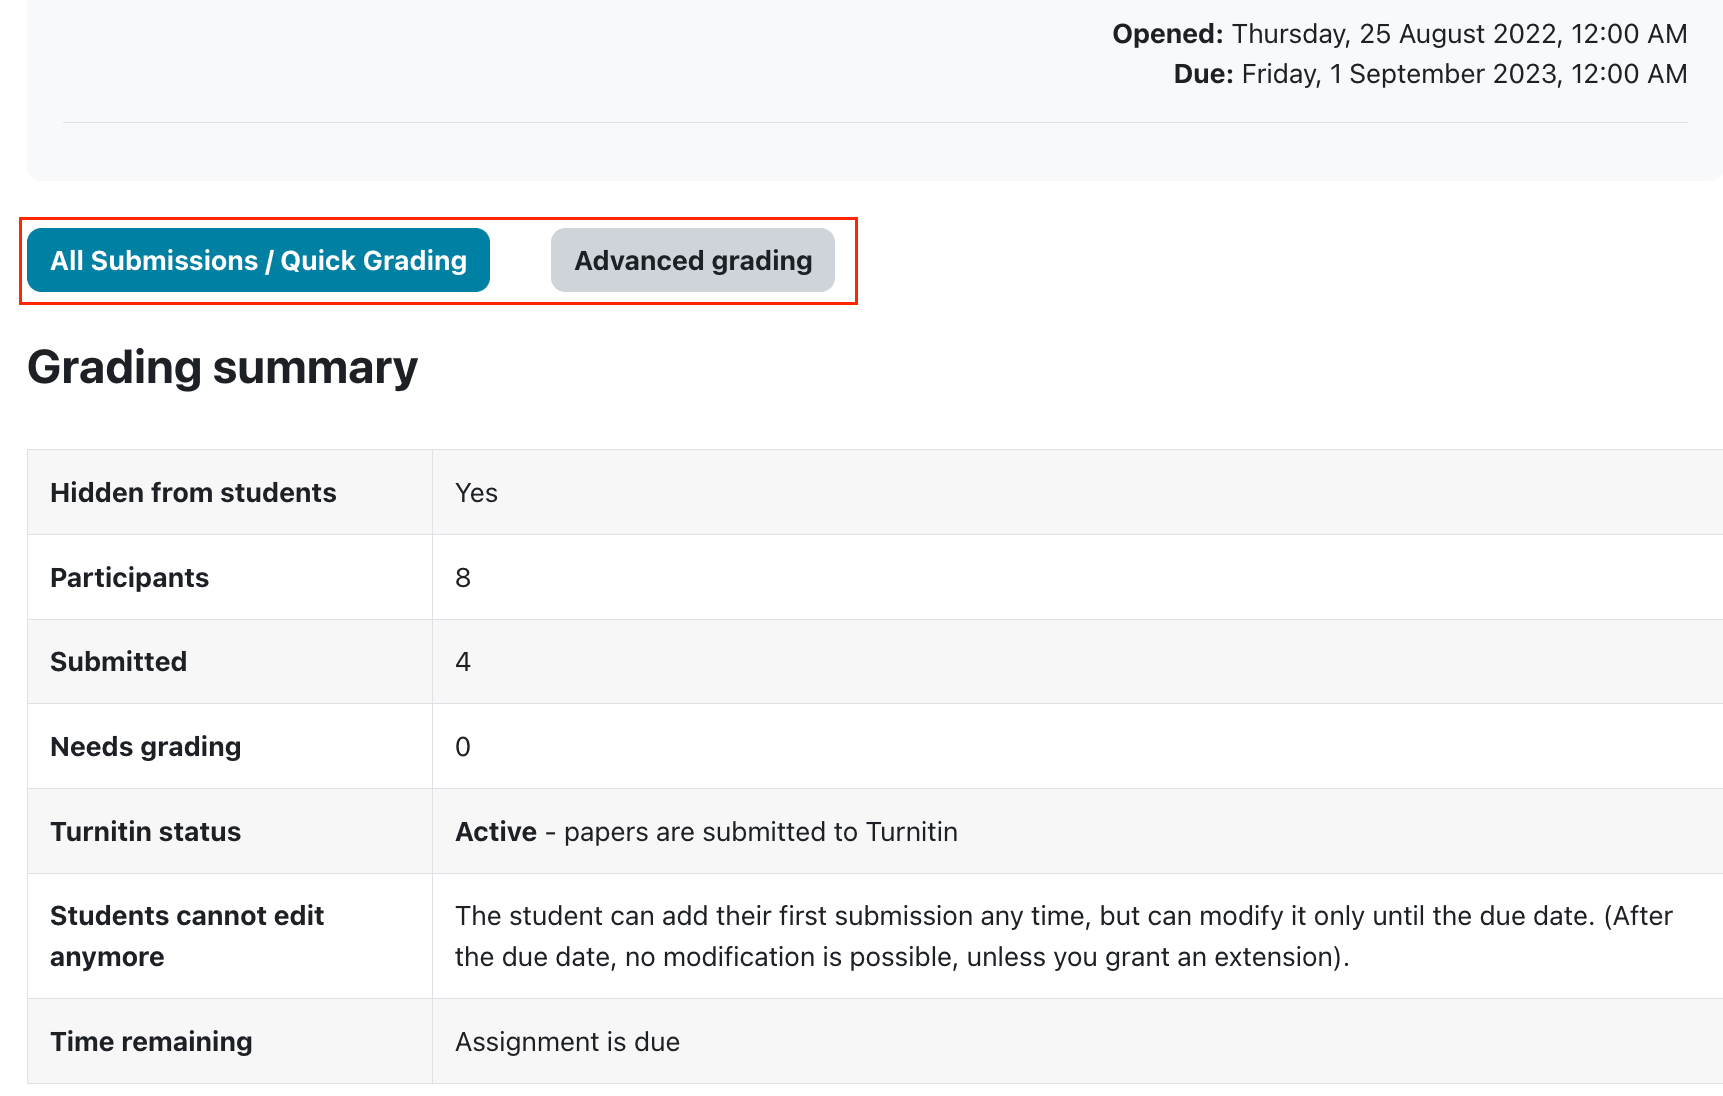
To grade items, open the assignment, then, click on the link All submissions / Quick grading button to see all submissons, or Advanced grading to see individual submissions in detail. Quick grading lists all the users in the course along with the submitted assignments and a time stamp indicating when the submission was last modified. This is an area where you can view student submissions, grade the assignment, provide feedback, and view the TurnItIn Originality Report. You may need to scroll to see all columns for more complicated assignments.
Quick Grading
With quick grading you will see each student's submission in a table. You can
- download and read their files and enter a grade and short feedback in the boxes next to their name
- click the Grade button next to their name to open up a more robust advanced grading.
- Change the workflow, status(see above at assignment settings) or grant extension for students
- Open the Turnitin Originality report or Grademark page if it is enabled
Layout of the Quick grading screen (filtering, settings, download all submissons):https://ceulearning.ceu.edu/pluginfile.php/100229/mod_book/chapter/2428/quick-grading-screen-2745.h5p
Focus on the submissions table (submissions, grading, Turnitin):
When finished, select the Save button at the bottom of the page. If the "notify student" checkbox is set to "yes", students get an email about their grades.
The grades you have entered will automatically be logged in the gradebook.
Advanced Grading
Click “Grade” beside an individual submission to open the advanced grading screen. On the left, you will see the Annotate PDF tool, and on the right, the advanced grading form.
Annotate PDF: This tool is similar to Turnitin GradeMark, but it works for native Moodle assignments. (Students need to submit their work in PDF or MS Word format to use this function.) You can highlight, mark, and comment directly on the student’s paper, and students will be able to view your feedback.
Advanced grading form: On the right side, you have more space to provide written feedback. You can also upload and return files as feedback.
Assignments with Turnitin
Instructors can use Turnitin two ways in CEU:
1. In Moodle with the assignment activity
The students submit their papers themselves to an assignment you created in Moodle. If you set the “Turnitin reports” to Enable, all papers what students submit will be sent automatically to Turnitin and the report will be created. This is the easiest and recommended method.
You can not submit files yourself, students need to do it themselves.
NEW: The reports will be created now even when students already submitted. After the setting is changed, it takes ~10 minutes for the reports to be ready.
Please see the step by step guide below.
2. Instructors submit the student papers to their own Turnitin account.
Details: https://ceulearning.ceu.edu/mod/book/view.php?id=75454&chapterid=1673How to create a Turnitin assignment in Moodle:
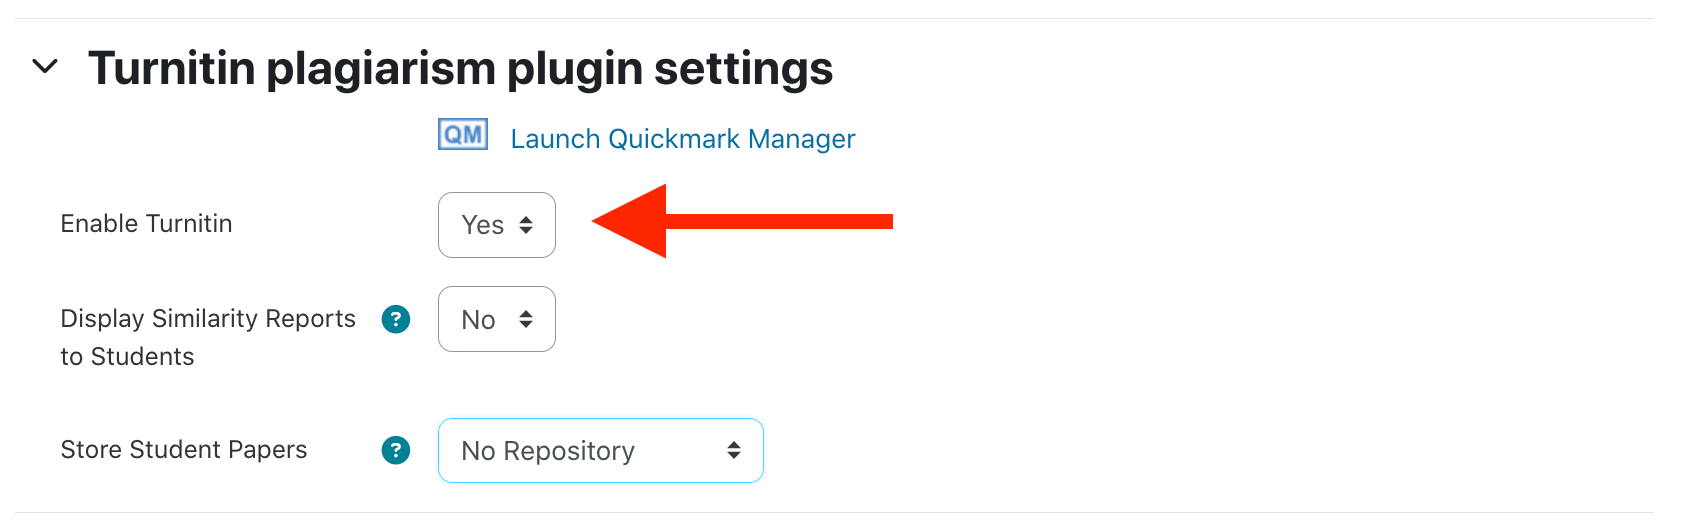
You can “Enable Turnitin” in the “Turnitin plagiarism plugin settings” when you create a new "Assignment" activity.
Click and select Assignment.
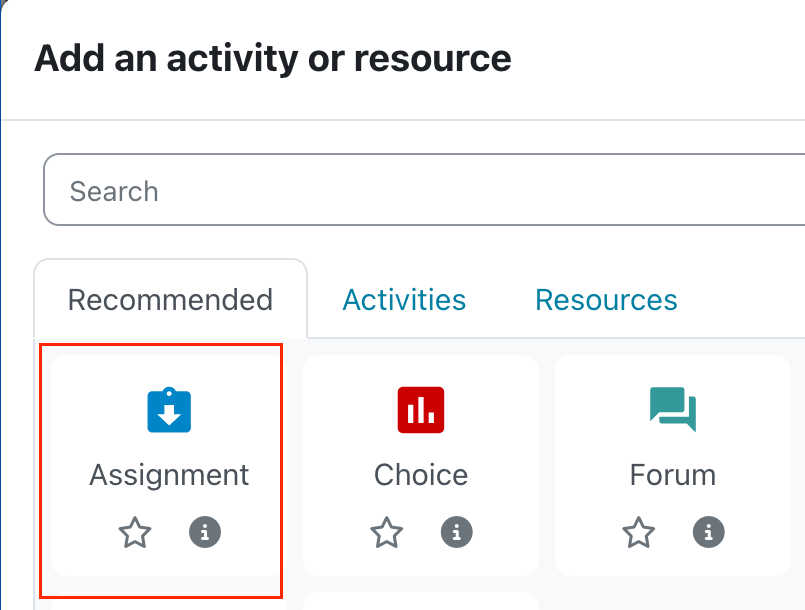
Click
and select Assignment.You need to "enable Turnitin". If Turnitin is enabled, all student papers will be automatically submitted to Turnitin, and you will be able to check the reports and optionally give feedback with Grademark outside Moodle in Turnitin.
Other options:
- Student Originality Reports: This option of assignment creation provides instructors with the ability to control whether students are allowed to view the Originality Report of their own paper or not. Change the setting to yes to allow students to see the Originality Report for the assignment. The default setting is no.
- Repository: The Store Student Papers setting has three options: in the Standard Repository, or to not store the papers. If the paper is stored in the “repository” it will be part of the Turnitin database so if anyone use parts of this paper in the future, Turnitin will be able to find this paper as the source.
Under Advanced Turnitin Options, you can choose to exclude the bibliography and/ or direct quotations.
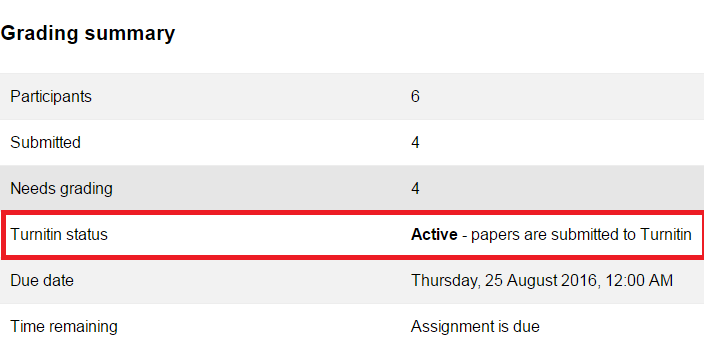
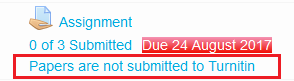
If you are unsure if Turnitin is enabled on an assignment you can check the Grading summary, also it is shown under the assignment link.
How to check the Turnitin Originality Report:
Open "All submissons / Quick grading" at the assignment.

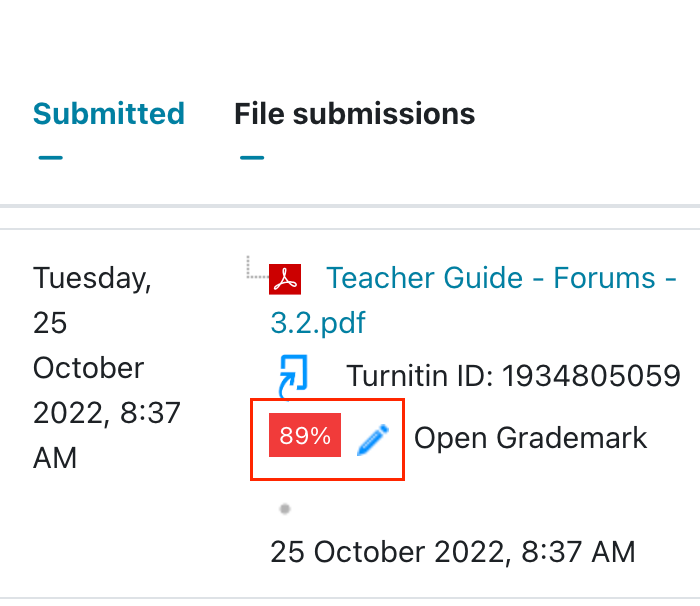
You will see the Turnitin icons below the submissions if Turnitin is enabled.
The colorful percentage will open the “Originality Report”.
The blue pen icon opens Grademark, the feedback facility of Turnitin.
Help for "Feedback studio" - the Originality report and Grademark.
Detailed help for Turnitin
- Original summarized version from the Internet archives
- New, full version (more detailed, but needs time to study)
a) Students would like to check the Originality Report
Students can't see their originality report and score by default. You can allow this if you decide so (edit settings > Student Originality Reports > Yes).
If you allow this, students will see the % value in the similarity column after they go to the Turnitin assignment.
They need to click on the percentile, a new window will open and it will load the originality report.
b) Problems with Turnitin (when enabled)
It may happen that the report does not appear, or the status is “pending”. This may be caused by the following reasons:
- It may take 24 hours for Turnitin to create the report. If a student modifies his submission, Turnitin will always wait 24 hours before the report is done.
- Turnitin can work with most editable file types, but will not work with images, excel or powerpoint files, or low quality scanned PDF files.
- The student has to accept the terms and conditions of Turnitin before she submits her first paper. If it is not done yet (or she selected “not agree”) the report will not be created. The only solution to this if the student accepts the terms and resubmit his paper (the filename needs to be changed).
How to enable students to modify their submitted assignments?
The default rules for student submissions for assignments:
- students can upload after the due date if they miss it (but the system will store the submission time)
- but they CANNOT change/modify their submission after the due date (so they cannot add a new file or modify an already uploaded one).
a) If you would like to allow ALL students to modify overdue submissions, edit the assignment and change the due date.
b) If you would like to allow a single student to resubmit, open the assignment and the student/submission list with "quick grading" and click "edit > grant extension".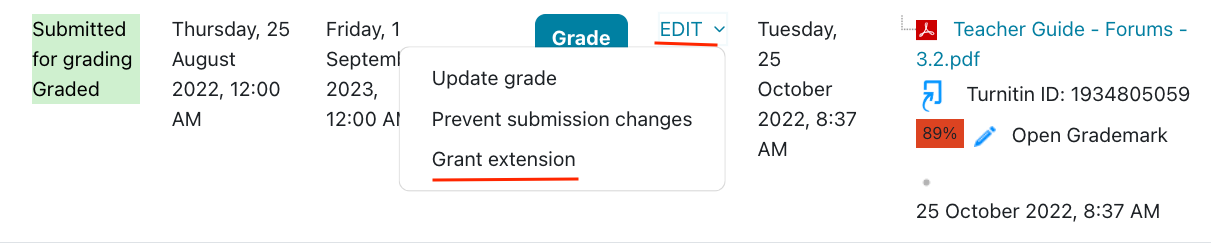
c) If the assignment is not overdue, but students still cannot submit, check whether the default assignment settings have been accidentally modified.
Open Edit settings (Turn editing mode on and next to the assignment > Edit> Edit settings) and check if:
- The due date is correct
- The cut of date is enabled by accident (the cut of date prevents students to work with the assignment any further)
- Restrict access is enabled
- Available for Group members only is enabled by accident in "common module settings" or you enabled "students submit in teams" but not all students are assigned to groups
- If you set a "submit button" at "submission settings - this setting is useful for assignments without a due date (as students can indicate they are finished). If this is the case, you can release a student submission with edit > revert to draft
Originality Reports
1. How can I Analyze the Originality Report (Turnitin assignment)?
The new integrated view of the Originality report and Grademark is called "Feedback studio".
The new integrated view of the Originality report and Grademark is called "Feedback studio".
Typical plagiarism cases:
- Original summarized version from the Internet archives
- New, full version (more detailed, but needs time to study)
2. What is detectable?
Many resources are not in the Turnitin database so using your own knowledge to detect a suspected case of plagiarism is required. The database to which papers are compared consists of three primary sources:
- Both a current and an archived copy of the publicly accessible on the Internet
- Commercial pages from books, newspapers, and journals
- Student papers already submitted to Turnitin
Please note, that in extreme cases it may even be questionable what has been created first - the uploaded paper, or the matching text Turnitin is working with.
Note: It is not supported by CEU to use AI detection tools. Only members of the disciplinary committee can use this if necessary.
3. The report shows 100% or 0% or pending. What does it mean?
100% almost always means that the exact same file were uploaded to Turnitin multiple times (100% means that all text is the same, name of the author, class, etc.). You can filter this source out to recalculate.
If a paper does not contain any matches this could indicate that:
- The paper is completely original OR
- Turnitin does not found the source (s) (Yet?)
Wait for at least 24 hours, then if it is important, you can try to resubmit. If there is still no report, contact me and we can file a request to Turnitin about this particular paper.
4. No report was generated
These can be the reasons:
a) The file format is not supported, or the file is not readable
Turnitin only accepts certain file types. Microsoft Word (.doc, .docx), OpenOffice/LibreOffice (.odt), PDF (.pdf), Plain text (.txt), RTF (.rtf), HTML (.html). Files outside these types, or corrupted files, cannot be processed. Some files may technically have the right extension but still be unreadable (e.g., password-protected PDFs, scanned images without OCR).
b) The student did not accept the Turnitin agreement (EULA). Turnitin requires students to accept the End User License Agreement (EULA) before processing their submissions. If the student declines, Turnitin will not generate a report. You need to ask the student to resubmit and accept it for the report to be generated.
c) Technical issue with the Turnitin connection - clicking on the "resubmit to Turnitin" usually solves this.
How to create a timed, simple essay type exam in advance?
A common exam type provides a sheet of exercises in Ms word or PDF at a specific time and asks students to answer the questions in Word and submit it back until a due date.This can be easily achieved with the "assignment" activity. If you would like to use multiple choice questions - use the quiz activity.
So if you would like to set up an exam with an essay, turn "edit mode" on -> add an activity or resource -> assignment
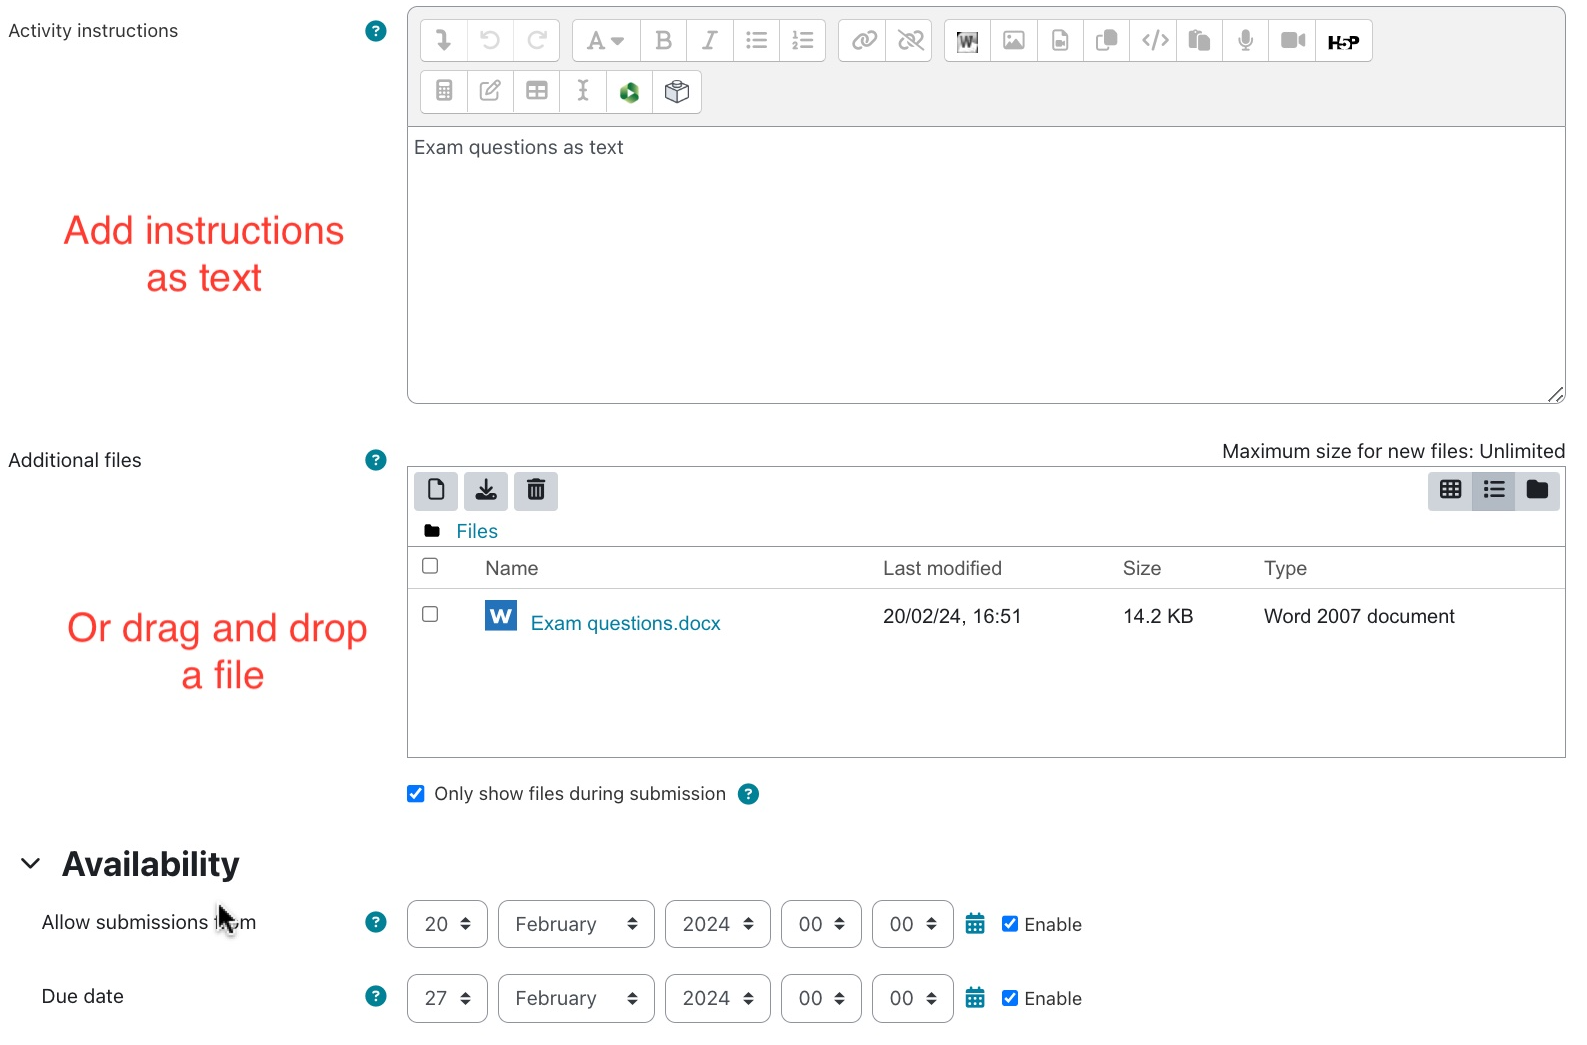
When you fill in the form, make sure that you set:
- The correct start (allow submissions from) and due date
- Type the questions into the activity instructions field (not the description!), or upload them as an "additional file".
- Important:
a) For additional file, you need to mark the box next to "only show files during submission" (see below on the image). This setting makes the instructions and or file hidden until the start date.
By default students can upload files back, but you can change this to online text if you wish.
Note: if the assignment does not start at the same time for everyone (you need a time limit) use the quiz activity, as the assignment does not have a feature for this yet.
Blind marking assignments (anonymous student uploads)
On your course page, click Turn editing mode on > Add an activity and resource > select assignment
You can enable “Anonymous submissions” under the “Grade” heading when you create a new "Assignment" activity. Under the Grade heading, from the Anonymous submissions drop-down menu, select Yes.
Note: This setting will be locked once a submission or grade has been made. You must enable this setting before students submit their work.
Scroll to the bottom of the page and click Save and return to course.
1. The Submissions page will show randomly generated Participant Numbers instead of student names.
Note: This setting does not affect the content or titles of submissions, so they should not include it in the filename or contents of their file.
Coordinators and admins will still see the identities.
2. Grade each submission as you would normally. During blind grading, students cannot see their own grades even after you have graded their submissions. You must first reveal student identities in order to release grades to students. At the top left of the page, from the Grading action drop-down menu, select Reveal student identities.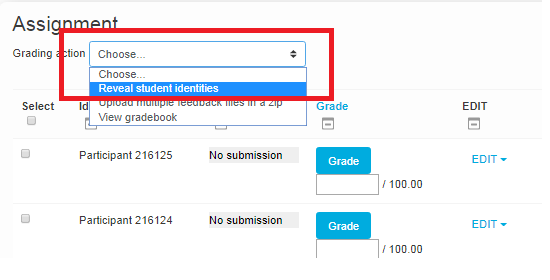
To confirm that you want to reveal student identities and release student grades to the gradebook, click Continue.
Note: After revealing students identities, you cannot go back to the blind grading mode.
Creating a forum and forum settings
The forum activity enables asynchronous discussions for students. By default, all students can start new discussions, view all posts and reply to them.
Most common uses
- Group discussion about a topic
- Student “repository” — an easy way for students to upload files to a course. Everyone can read and reply to each discussion and check the files. The teacher can act as a moderator.
- Project collaboration with groups
- Blog or journal - other students can read and react
Note: The Main Course Forum (formerly "general news") is automatically part of all courses. It is recommended for important news or course-wide questions. Both teachers and students can post here. All course participants will receive an email about new posts (subject to subscription settings).
How to create a forum for student discussions
- Go to your course and click Turn editing mode on (top right).
- Many icons and menus will appear. Click the menu called
 in the appropriate topic and choose Forum.
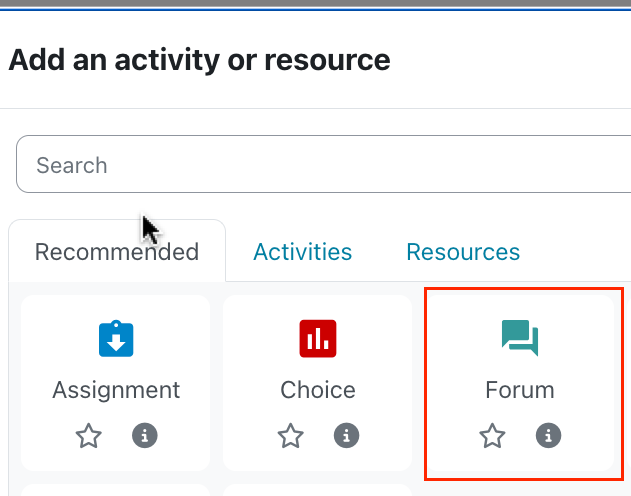
- A form will appear. Fill in the first few fields and change settings if necessary. Most default values are fine except for the fields explained below. Click Save and return to course when done. You will see a forum link appear on the main course page. Inform your students about the forum and include any necessary instructions.
I. Important settings
- Forum name (mandatory): This will appear as the link name on the main course page.
- Forum description: Provide details and expectations for students.
You can copy/paste the following technical help section for students:
Forum type
Choose the forum type that matches your pedagogical needs:
- Standard forum for general use (default) — an open forum where anyone can start a new topic at any time. Best as a general-purpose forum.
- Blog-like format — starting posts appear in full on the main forum page with “discuss this” links.
- A single simple discussion — one topic on one page. Useful for short, focused discussions.
- Each person posts one discussion — each person can post exactly one new discussion topic (everyone else can reply). Useful when you want every student to start a topic and have peers respond.
- Q and A forum — students must post an initial response before they can view other students' postings. This encourages independent thinking. Note: Teachers may want to post the initial question/topic.
Tip: It is recommended that the teacher starts the first discussion topic (a question for students). This encourages participation and sets the tone.
II. Advanced settings
Grading forums
- Ratings (grading individual posts)
If you enable ratings for a forum, you can choose how individual post ratings are aggregated into a final grade for the activity. Options:
- Average (default) — the mean of all ratings for that user's posts- Count — the number of rated posts becomes the final grade (rewards activity)
- Max — the highest rating becomes the final grade (only best post counts)
- Min — the lowest rating becomes the final grade (only worst post counts)
- Sum — all ratings for a user are added together (capped at the activity maximum)
Multiple teachers can rate posts; Moodle will combine ratings according to the chosen aggregation method.
- Whole forum grading (one final grade for the forum)
One grade to add for the whole forum - similar to assignment gradings. Only a grade can be added, no feedback field available (if you would like to provide feedback, just reply privately to the student.)
Grade maximum, point (for both type): By default the max is 100; you can change this to any value (the maximum points available for the forum).
- Due date
- Subscription: email notifications
When a person is subscribed to a forum they will receive email copies of every post (usually sent ~30 minutes after the post). People can usually choose to subscribe or unsubscribe themselves unless subscription is forced.
- Force subscription: All current and future course users are subscribed and cannot unsubscribe (use sparingly).
- Auto subscription: New users are subscribed by default but can unsubscribe later.
- Optional subscription: Users are not subscribed by default but can choose to subscribe.
Important: Changing subscription settings affects future behaviour but does not always change existing subscribers:
- Changing from Auto to Disabled will not unsubscribe existing participants — it affects future users only.
- Changing to Auto subscription may subscribe existing course users (behaviour introduced in recent Moodle versions).
Note: Manage subscribers (manually)
- Go to the forum.
- Select subscriptions (email updates)
- At the view subscribers menu you can see existing subscribers, clicking on it enables to select manage subscribers

- Select users and use the Add / Remove buttons to subscribe or unsubscribe them.
- Common module settings > group mode > separate groups
If you use this setting, students submit individually, but it will be possible to distribute students among teachers. For this you need to add the graders with "non-editing teacher" role to the course or change the permissions on the assignment for other teaching roles and assign the instructors and students in groups.
After this, the instructors will see only their own students. This may be useful for example for thesis supervisors.
- Restrict access: make the activity available for a selected set of students only. Details about this.
- Enable Turnitin: this setting would send all text messages / files to Turnitin, so this is recommended only for really specific forum.
Workaround: By default instructors cannot send papers to Turnitin directly from Moodle with assignments. This forum setting makes it possible for instructors to use hidden forums now to quickly send files into Turnitin.
- Posting anonymously: New forum type - Open forum
Workaround: By default instructors cannot send papers to Turnitin directly from Moodle with assignments. This forum setting makes it possible for instructors to use hidden forums now to quickly send files into Turnitin.
The forum activity does not enable to post anonymously. But we have a different activity for this purpose, called open forum
You can find this new activity at the activity chooser - this setting is enabled by default. A great way to use anonymous posting is when you want students to ask questions around exam materials or around points they find confusing. This can help students feel more comfortable engaging and seeking help. Anonymous posting hides the author's name (teacher and students) for posts in the forum. Teachers can choose to reveal their identities in posts by checking the Reveal yourself in this post when creating or replying to a post. You can select this option for individual posts and remain anonymous in others.
Note: this is just a "soft" anonym setting, instructors can reveal all identities later in the forum.
Create an exam with Quiz
Creating a Quiz is a two-step process.
Notifications - Students get an email notification after submission, and after their Quiz gets graded manually. Also they get a reminder email two days before the Open time of a Quiz. You can turn this reminder off at "Common module settings -> ID number, just include "noduesoon" and a number in this field.
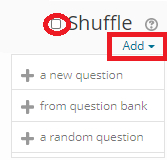 Open the Quiz and click on "add questions". > Add > A new question
 - If the questions are already created, you can select "from question bank" or "random question" to add them.
- If you click on shuffle the order of the questions will be randomized and all students will get them in a different order. Randomizing the order of the questions
Once you have added all the questions you need, your quiz is ready for students and will already be visible on the page (unless you hid it while you were setting it up.)
It is a good idea to preview your quiz by clicking in the block Administration > Quiz administration > Preview.
To see the grades once students have done your quiz click on the link below/next to the Quiz 'Attempts ='
Ensuring Exam Security: Closed and Open-Book Exam, Safe Exam Browser
Secure Exam Options
Where:
1. Only in Computer labs
You need to contact Classroom Support for more information or to set up and book the lab.
Exam Types:
-
Closed-book exam
-
No internet access at all.
-
Moodle activities cannot be used.
-
Students save their work to the P drive; instructors can collect the files in the lab.
-
-
Open-book exam
-
Limited internet access: only the CEU Moodle page opens, and only in Edge.
Both Assignments or Quizzes can be used for submissions
-
2. Anywhere (bring-your-own-device)
- Students need a laptop with Safe Exam Browser (SEB) installed.
- Only Quizzes are supported.
Using Safe Exam Browser (SEB):
-
When creating or editing a Quiz, enable SEB by selecting (do not change the defaults unless you know what you are doing):
“Yes – CEU template - CEU SEB template"

- This ensures:
-
Students start directly from the Quiz after download.
They cannot exit until the Quiz is finished.
-
Students cannot navigate away from the Quiz page or open other software during the attempt.
(Note: If you allow SEB exams at home, students may still use other devices outside of SEB’s control.)
How to do a survey for the students with the Feedback activity
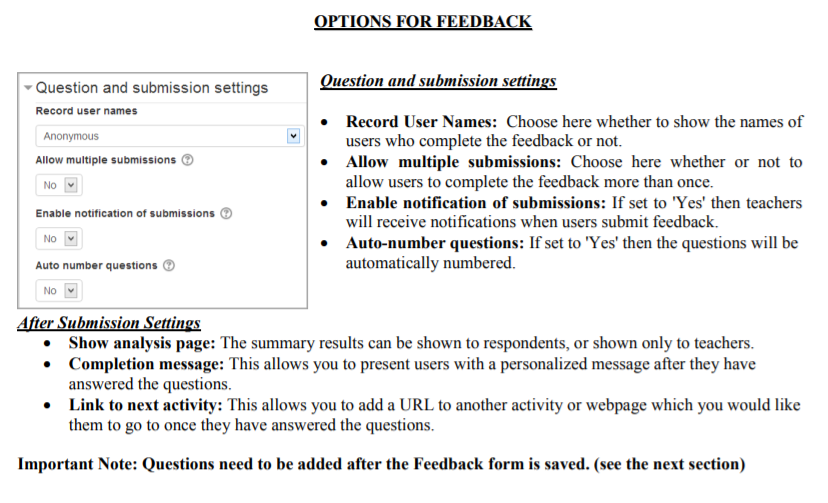
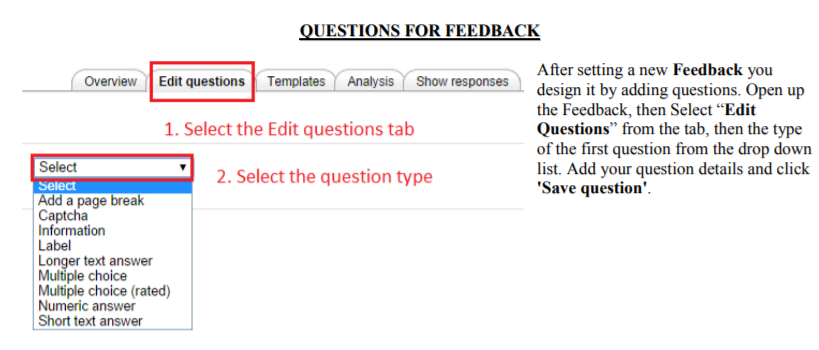
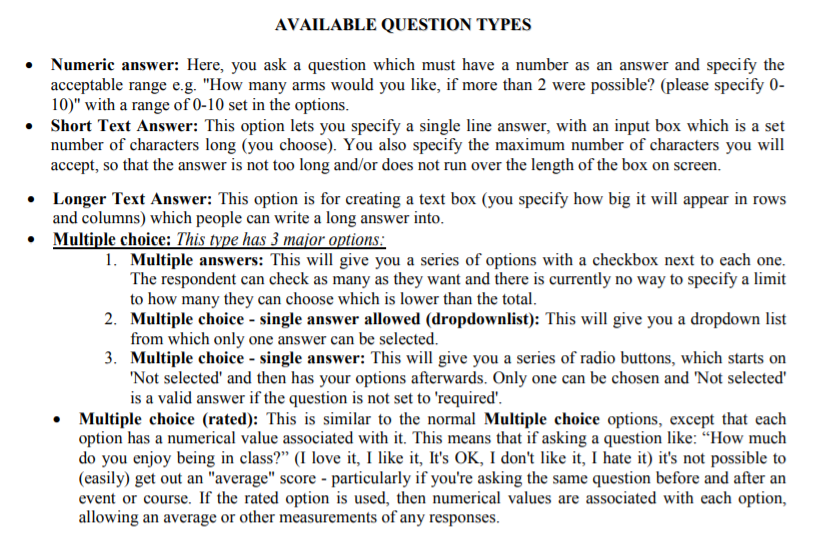
5. Notify students about this (you can send out the direct link of the activity if you wish. You will see the responses at the "analysis" tab.
How to create an attendance sheet with the Choice or Checklist activity?
We have two activities which can be used for this purpose:
1. The Choice activity, if you want the students to mark their own attendance
2. The Checklist activity, if you would like to mark the attendance of all students yourself
1. Use the Choice activity, if you want the students to mark their own attendance
a) Go to your course, turn edit mode on and go to the section where you would like to place the attendance sheet.
Click on the menu and select Choice.
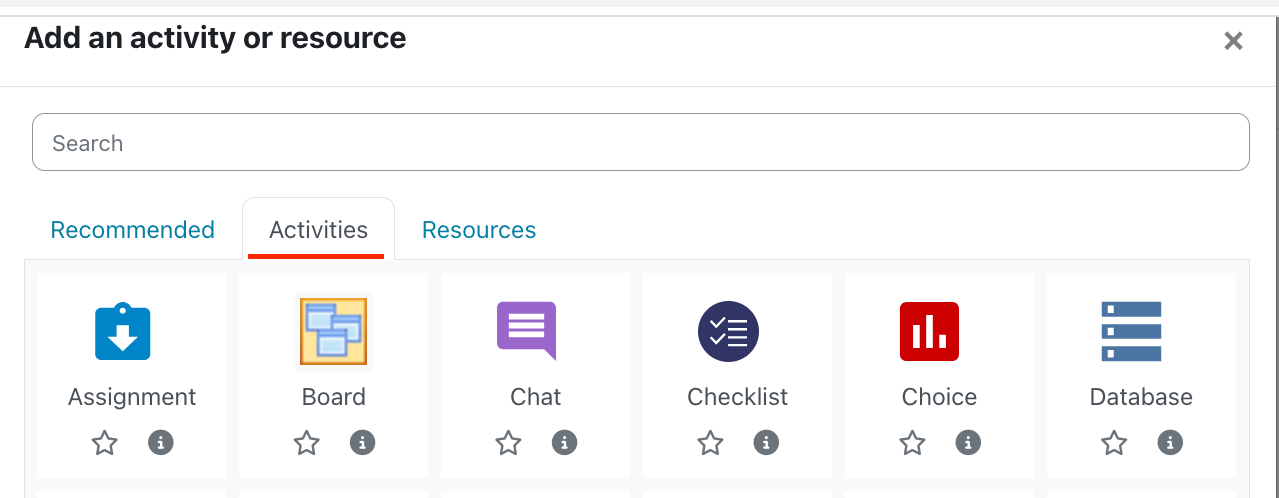
Fill in a title (Attendance sheet for XXXX session), and a description ( "Check the appropriate box before the course starts").
Add the options for the students and set the start and end time for the sheet (some time before the class and after it started) and Save and return to course.
For example:
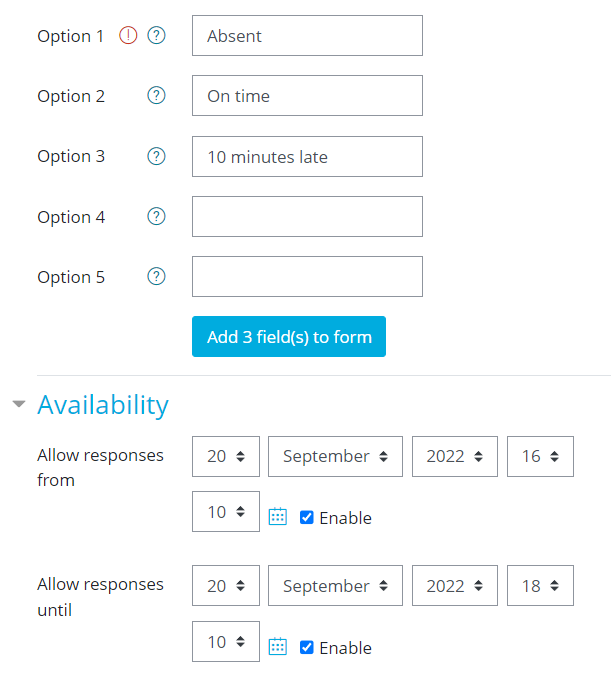
b. If you need one for the next session as well, just go to the Sheet already created, click on the 3 dots next to it and select duplicate. This will create a copy of the activity. Move the copy next session with drag and drop, then 3 dots > edit settings - change the title and the deadlines and Save.
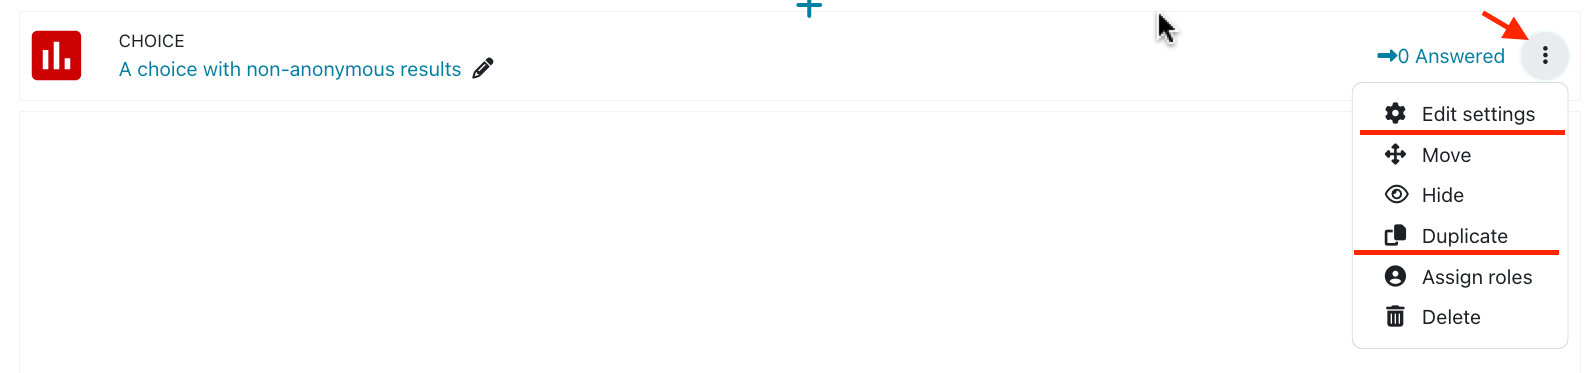
2. Use the Checklist activity, if you would like to mark the attendance of all students yourself
a) Go to your course, Turn edit mode on and go to the section where you would like to place the attendance sheet.
Click on the menu and select Checklist.
Fill in a title (Attendance sheet), On the form, change: "updates by" to teacher only. Change the grade to 0 (if it will not be graded. Leave the other options at default and save the form.
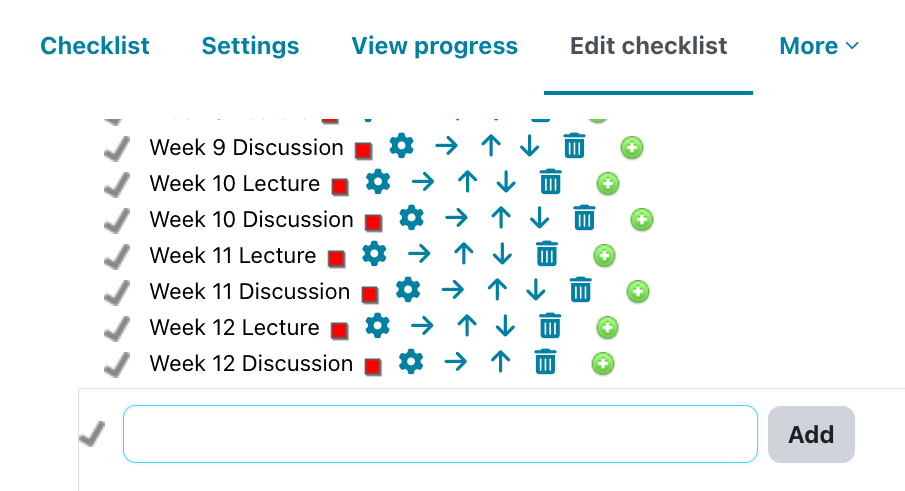

Click SAVE after you are done.
The students will see their own lists only.
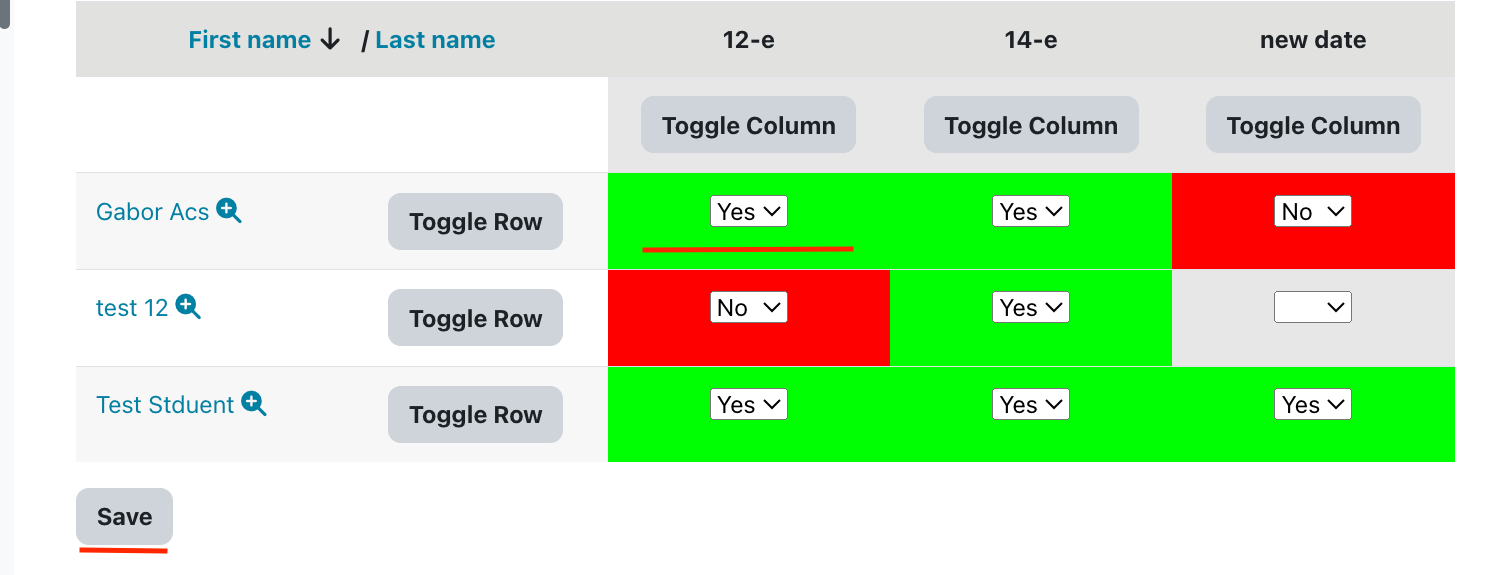
How to create a sign-up sheet with a wiki
1. Open MS excel, and create a table with the necessary titles for the columns and rows. No formatting is necessary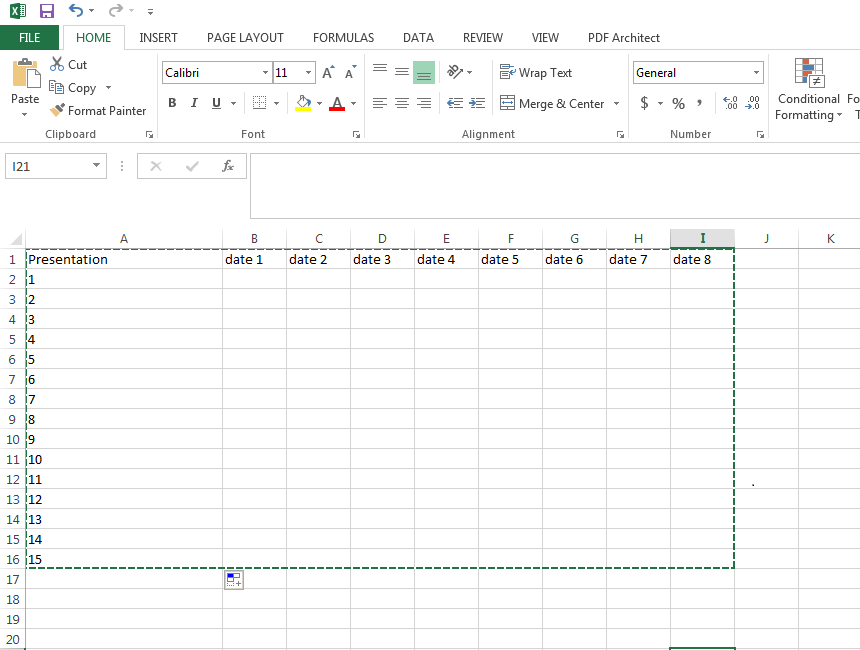
2. Go to the course, Turn editing mode on > Add an activity and resource and select "wiki".
3. Write instructions (do not paste the table yet!!!) into the description field, and change the title. Save the form as you are ready.
4. Open the wiki you created and click on "create page"
5. Copy and paste the table into the "edit" tab of the wiki and save.
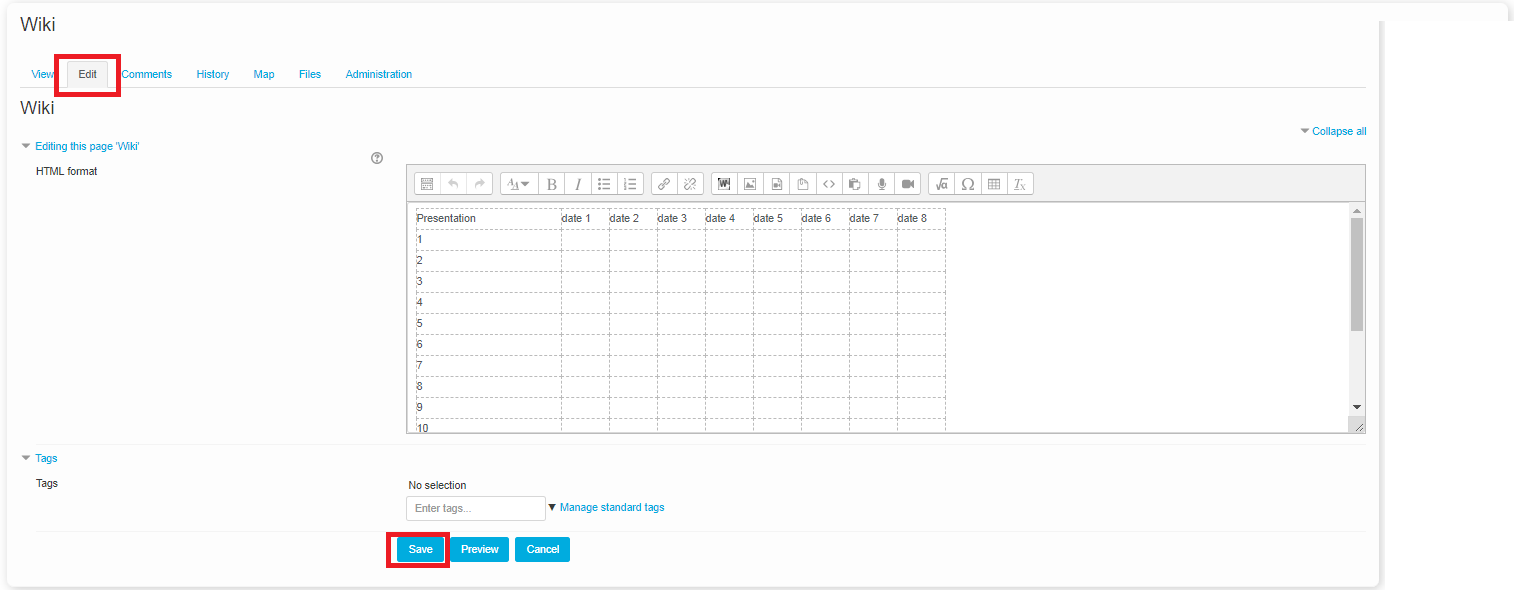
You are ready, students can edit the wiki the same way - open it, edit and save with their contributions.
How to create a Board for students to post and vote (Padlet substitute)?
The Board module for Moodle is a plugin that enables a post-it board activity for students. This is a collaborative activity where the teachers sets out a number of columns with optional names and then students add contributions to columns.
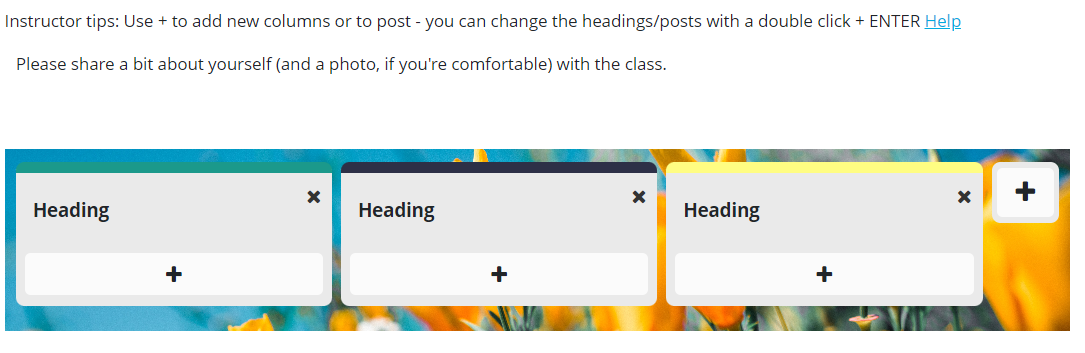
- Students do not see who has posted what
- Nobody can vote on her own posts
- Contributions can be exported by instructors in excel (with student names) at the board administration
1. Go to the course, Turn editing on > Add an activity and resource and select "Board" from the activities tab.
2. Write instructions into the description field, and add a title.
Relevant options what can be changed at "board settings":
- Rating is enabled by default, you can disable it
- You can add a deadline for student posts
Save the form as you are ready.
3. Open the Board and set up how many columns are needed. You can remove them with X and add new ones with +.
Heading titles can be changed with double click and saved with ENTER.
4. Students can add posts to any column - this is simple text, and an image, link or video can be attached to posts.
Other available activities
These activities are not that commonly used, but may be useful for some cases.
Some of them are not easy to use so these are not enabled by default - you need to request them if you are interested and want to use these.
Active (Guided) Quiz (need to be requested)
The Active quiz activity enables an instructor to create and administer quizzes in real-time.
A time limit may be set to automatically end the question, or the instructor can manually end the question and move on to the next one. Instructors can monitor group or individual participation, real-time responses of the participants and the question being polled.
Each quiz attempt is marked automatically like a regular quiz and the grade is recorded in the gradebook.
SchedulerThe scheduler activity helps you in scheduling appointments with your students.
Teachers specify time slots for meetings, students then choose one of them on Moodle. Teachers in turn can record the outcome of the meeting - and optionally a grade - within the scheduler.
Group scheduling is supported; that is, each time slot can accommodate several students, and optionally it is possible to schedule appointments for entire groups at the same time.
A SCORM package is a collection of files which are packaged according to an agreed standard for learning objects. The SCORM activity module enables SCORM or AICC packages to be uploaded as a zip file and added to a course.
Content is usually displayed over several pages, with navigation between the pages. There are various options for displaying content in a pop-up window, with a table of contents, with navigation buttons etc. You need to have this content (edited by you with other desktop software or downloaded from a repository), it cannot be built directly in Moodle, this activity just shares it.
Wordcloud (needs to be requested)
The Wordcloud module allows users to create collaborative word clouds with several useful features:
- Configurable minimum and maximum number of words per student
- Words can be edited or deleted by users with the appropriate capability
- Wordcloud visuals can be exported as .png files
- Wordcloud data can be exported as .csv files
- Supports user groups: each group can have its own wordcloud
- Clouds are updated live
Group Choice
The Group Choice module allows students to enrol themselves in a group within a course. Teachers can select which groups are available and set the maximum number of students allowed in each group.
Grading in Moodle
Moodle has a powerful gradebook, and usually you do not need to edit this or change any settings - as you create assignments (and other activities) in a course and grade them, the gradebook entries will be automatically created. So if you create activities for every item you want to grade, no further action is needed.
 menu and select the activity you would like to add.
The most basic activities are really easy to create (you just need to fill in a title, a description and a due date on the form and save).

By default, any gradable activity will be created as a maximum grade of 100 points - you can change that when you create the activity.
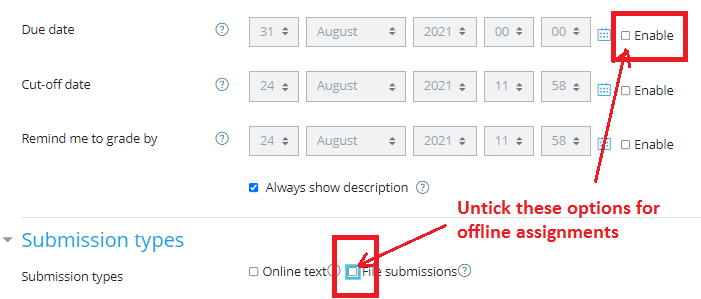
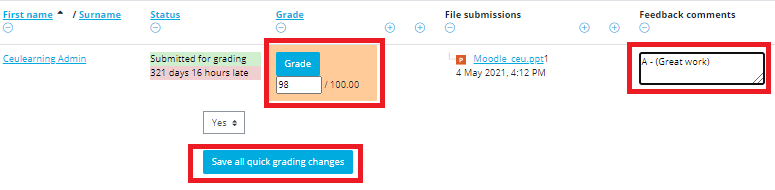
For example, the quick grading of an assignment will look like this:
For Simple weighted mean the weight of each item is simply the difference between its Maximum and Minimum grade.
Example:
A1 70/100, A2 20/80, A3 10/10, category max 100:
(0.7*100 + 0.25*80 + 1.0*10)/(100 + 80 + 10) = 0.526 --> 52.6/100
For the "Weighted mean" method each grade item can be given a weight to change its importance in the overall mean. If you need to change to this method, follow these steps:
The “final grade” format in the gradebook now represent the CEU grading scheme - so the automatic calculation in Moodle will be transformed from points to percents + letter grade.
Important note: the official grades need to be submitted to SITS.
You can download all grades in XLS at either the Paticipants menu, or open Grades - and you will find it in the gradebook administration.
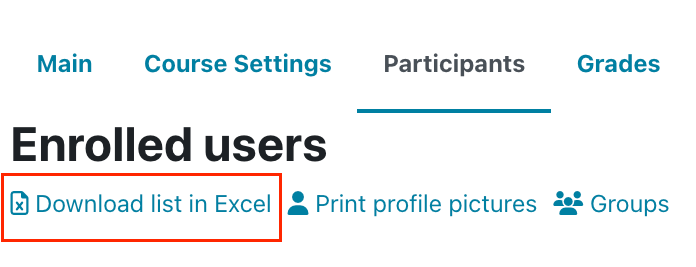 |  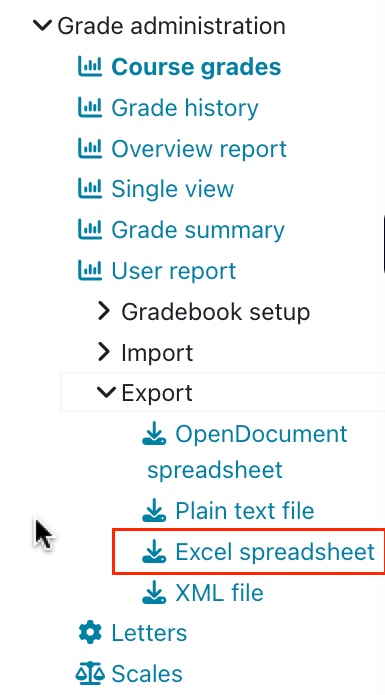 |
|---|
The grades / final grade will look like this in an example class (students will see only their own points / final grades):
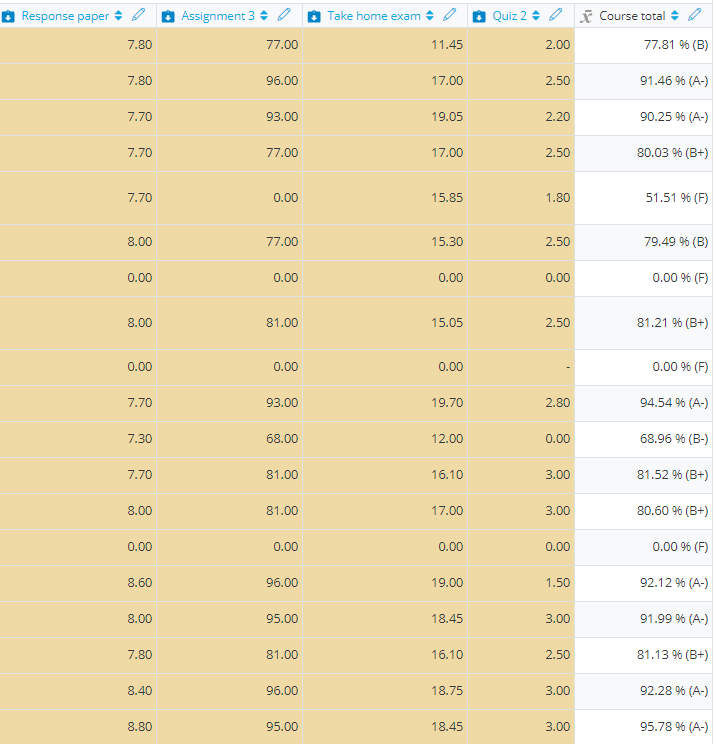
How to use and modify weights in the gradebook?
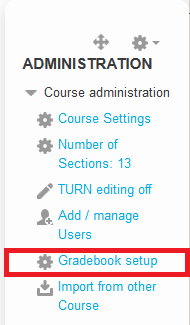 The Gradebook in Moodle can help you organize and manage grades in your course.
- Students can view their own grades at one place.
- When grades are awarded from within a Moodle activity (assignment), scores are automatically added to the gradebook.
- Scores can also be manually added or edited (Overridden) in the gradebook.
- Scores in the gradebook can be imported and exported (download scores to calculate grades in external software tools such as Excel).
In order for Moodle to easily aggregate scores automatically, entries in the gradebook are numeric by default. The default score for each activity is 100. You can then control the weights of individual activities to aggregate a final score for the class. If you prefer to grade only with letters no numeric scores are involved and Moodle cannot aggregate a final grade for the course.
Default calculation of the final grade in Moodle - Simple weighted mean or weighted mean.
If you would like to give extra credits (see below), use Natural.
For simple weighted main, the weight of each item is simply the difference between its Maximum and Minimum grade.
Example:
A1 70/100, A2 20/80, A3 10/10, category max 100: (0.7*100 + 0.25*80 + 1.0*10)/(100 + 80 + 10) = 0.526 --> 52.6/100If you would like to adjust the weights of individual assignments, you need to change gradebook calculation method to "weighted mean of grades".1. Go to the Gradebook, and select the "Gradebook setup" menu.

2. Click on the "change" link next to the aggregation method, and change the "simple weighted mean" to "weighted mean of grades" and save.
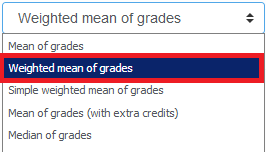
3. For "weighted mean of grades" adjust the weights next to individual assignments.
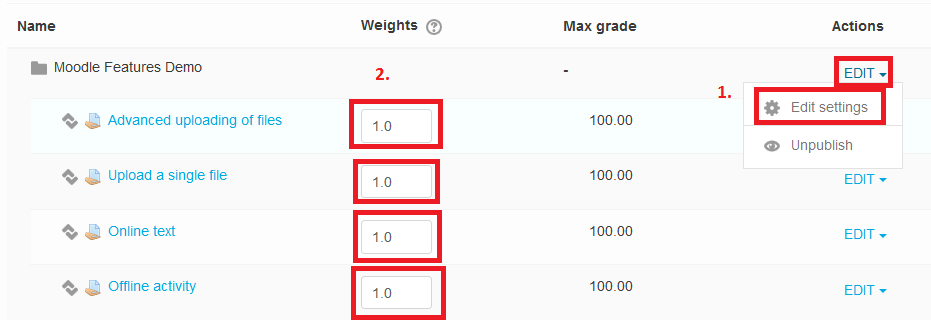
So it will work like this:
Each grade item can be given a weight to influence its importance in the overall mean. In simple terms, the "total" will be equal to the sum of the scores in each grade item, these scores being multiplied by the grade items' weights, and that sum being finally divided by the sum of the weights, as shown in this example.
Example:
A1 70/100 weight 10, A2 20/80 weight 5, A3 10/10 weight 3, category max 100: (0.7*10 + 0.25*5 + 1.0*3)/(10 + 5 + 3) = 0.625 --> 62.5/100
How to set extra credits?
You need to use the Natural aggregation method.
To set an item to add extra credits instead of normal grading click on EDIT > edit settings next to the item.
Tick the "extra credit" box and save.
This means that the grade item's maximum grade will not be added to the category total's maximum grade, but the item's grade will.
Example:
Item 1 is graded 0-100 Item 2 is graded 0-75 Item 1 has the "Act as extra credit" checkbox ticked, Item 2 doesn't. The course total will be graded 0-75 A student gets graded 20 on Item 1 and 70 on Item 2 The student's total will be 75/75 (20+70 = 90 but Item 1 only acts as extra credit, so it brings the total to its maximum)
Note that this is not a solution for providing extra credit within a grade item, but for adding extra credit as a separate grade item.
Restrict access - How to give access to resources to one (or a few students)?
Restrict access
make certain activities or resources available to a selected set of students
- if you have groups set up in the course, you can restrict for members of a group as well.
- One more common use for this feature is to restrict the access for a resource by date. For assignments, the due date featre is recommended, this can be handy if you would like to prevent access to a resource completely in a time frame.
- If you are using activity completion in the course, you can connect activities together with this feature - so students cannot open an activity if an other one is not finished.
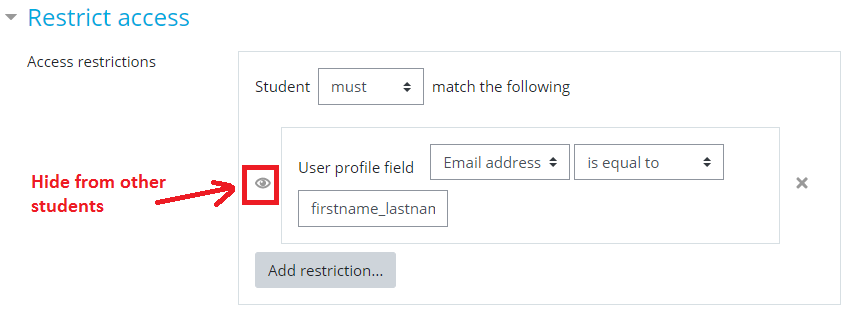
Detailed help:
https://docs.moodle.org/310/en/Restrict_access_settings
How to create groups and set up group work for activities?
The Groups feature allows you to divide the students in your course into different groups to easily separate them. Students can use Moodle activities as members of these groups afterward, allowing them to work together closely.
- You can change forums into group forums - allowing you to communicate with the members of each group separately.
- You can gather assignments from teams
- You can restrict activities/resources to be available/visible for only members of one group, not the other.
- If graders with the "non-editing teacher" role are assigned to the groups as well, this feature can be used to restrict them to see/grade only students in their groups. This can be useful for thesis supervisors.
I. HOW TO CREATE GROUPS
It is important to set up the groups before releasing an Activity using them.
Step 1:
Go to the Participants menu and select Groups directly or from the "manage users" menu in the Administration block > advanced.
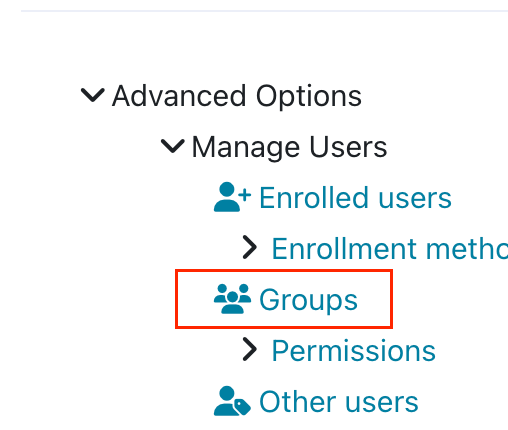 |
 |
|---|
Step 2: Create the Groups
You will see a screen with two columns: Groups and Members. If no groups have been set up, both columns will be empty. Create each group by clicking the Create Group button, typing a name into the Group name field and clicking Create group.
The other fields are optional, most of the time can be ignored. The new group then appears in the left-hand column. Alternatively you can use Auto-create groups. This option can create multiple groups and assign students randomly.
Naming scheme: @ (A,B,C) or # (1,2,3)
Auto create based on: Number of groups or Number of students - then add the count.
So if the course has 15 students and you select 3 groups, 5 students will be assigned randomly.
Step 3: Add users to the Groups
This process is manual and is dependent on the students having already enrolled on your course.
Select and highlight the group you want to set by clicking it once.
Click Add/Remove Users button on the right.
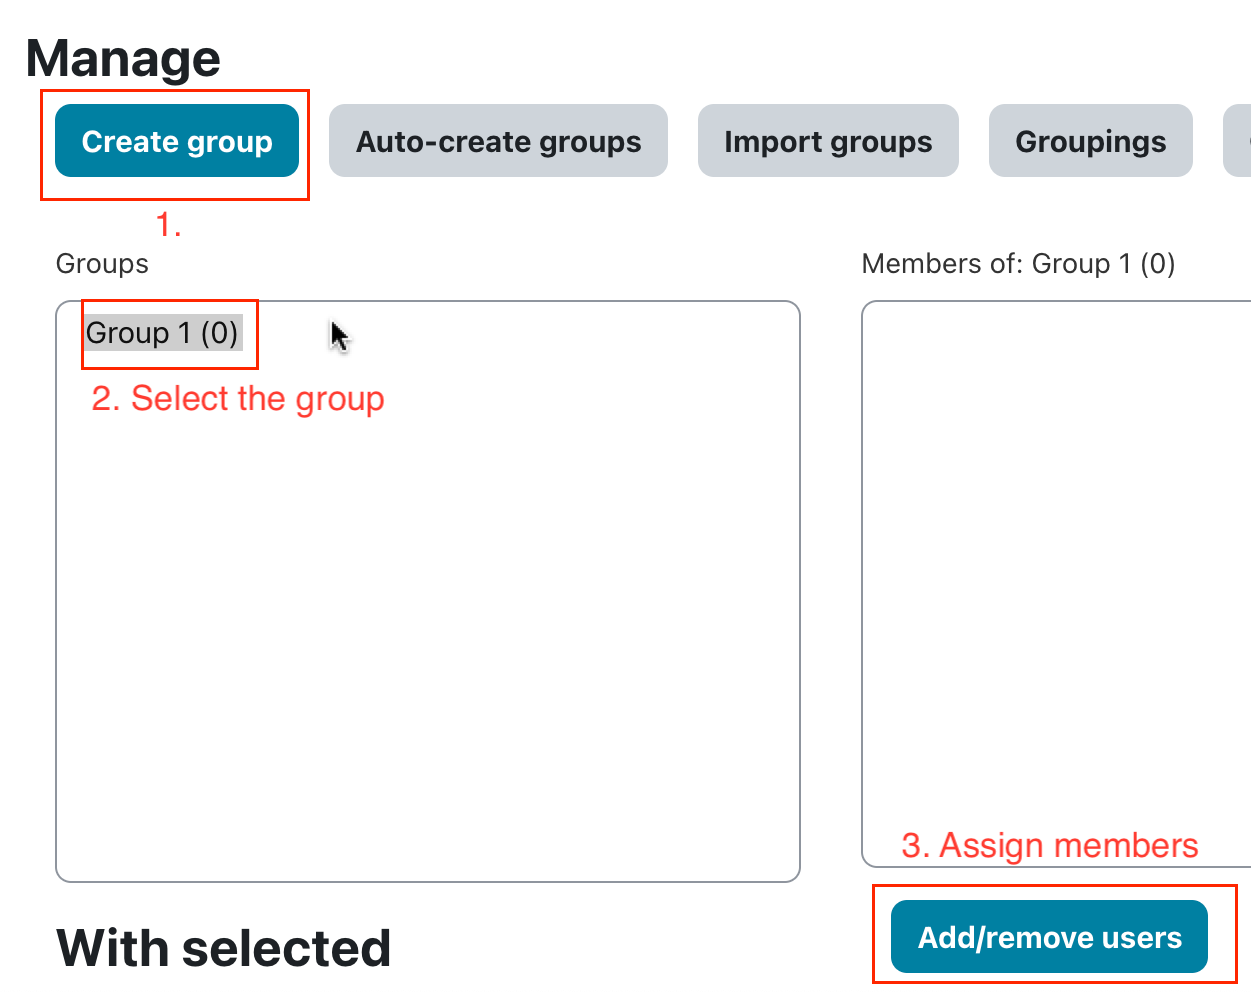
You will see lists of existing (left side) and potential (right side) members.
In the “Potential members” list, select the users you want to add to the group (hold down the Ctrl key to select multiple users). Then click the add button to add them to the group.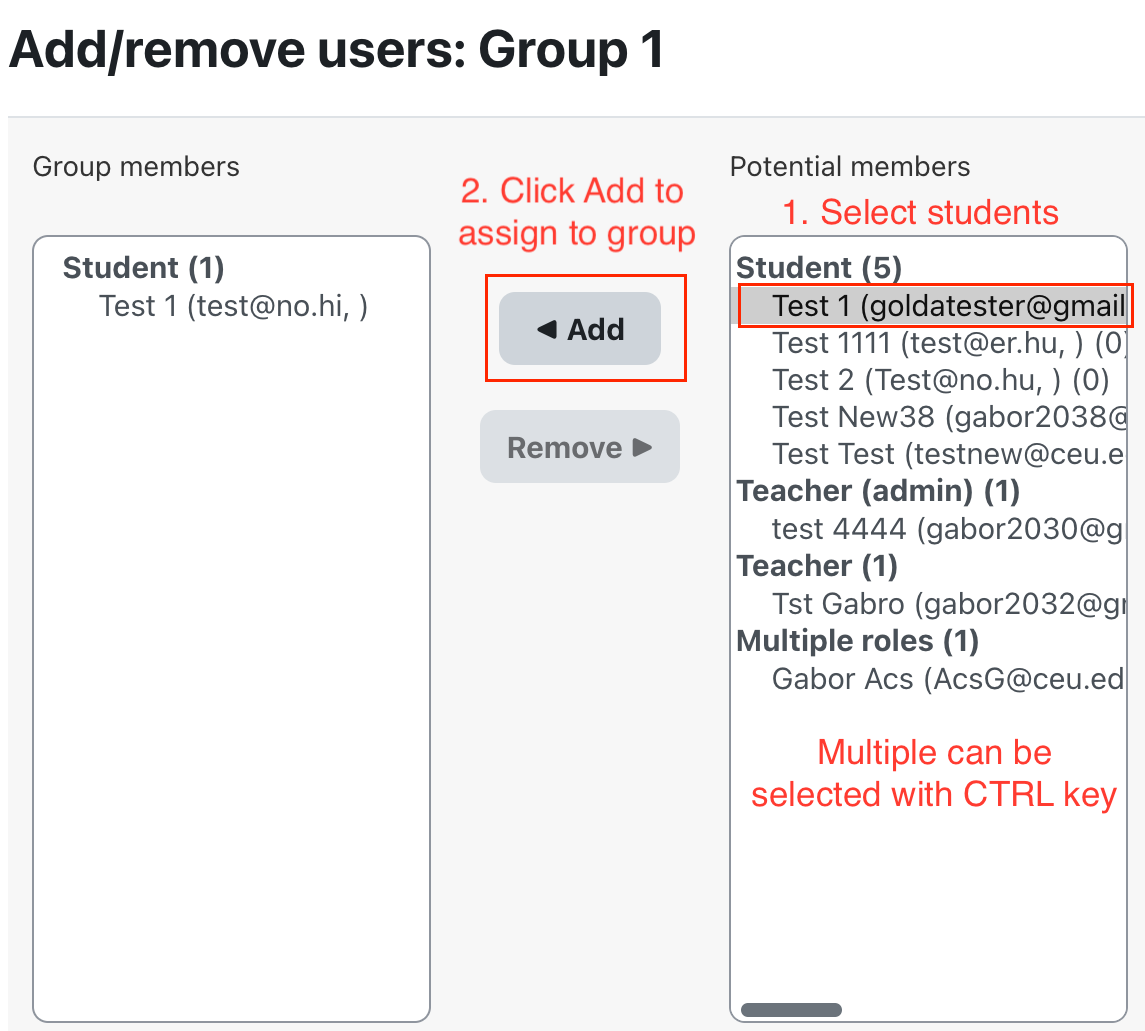
Repeat these steps for each group you want to use. You can add a single user to multiple groups if it is needed.
Make sure that no students are left out - as it will mean that they cannot take part in the activities set for group work.
Note: You do not have to add teachers (or TAs or Teacher admins) to any groups by default, teachers can check all of them.
Non-editing teachers can be assigned if you would like for them to be only to see and grade their students at assignments. Can be useful for thesis supervisors for example.
Note 2: Students will not be notified about this automatically, and not able to see the Groups menu. You need to notify them by other means (like by using the Main course forum).
Note 3 - Group Choice: this is a separate activity what can be used to allow students to select their own groups instead of assigning them manually. You just need to fill the mandatory fields and add the maximum number of students allowed in each group.
Details about group choice
Note 4 - Groupings (set of groups)
Sometimes you will not use the same groups of students for the whole course and you will need a different setup for different activities. The Groupings function is designed for this purpose. A grouping is a collection of groups within a course, also used to restrict access to an item to a subset of students.
Details about Groupings
II. USING GROUPS
After the groups are created, you can use them for activities in the course. To make the created groups take effect, you need to edit the relevant activities and apply the group settings.
Option A) - Restrict the activity to only one group
After the groups are ready you can edit any activity or resource with EDIT > edit settings, scroll down to the "restrict access" tab, select "add restriction" > group (select the group), and save. This activity will be available for only the selected group from now on.
This can be used for any activity, even for resources like text and readings.
Option B) - Set up group work for the activity
All groups will be able to use the activity, but they will be separated from each other.
- To change a forum into a group forum > edit the settings of the forum > select the "common module settings" tab and change the group mode into separate groups.
Note: Alternatively the visible groups allow students to see all discussions, but only participate in their own groups topics.
- If you use this "separate groups" setting for assignments, you can restrict non-editing teachers to their own students. Students still submit individually. Other teaching roles can be used as well, but if this is the case their permissions need to be modified (as teachers can view all groups by default). For this, please ask for assistance.
- It is not that common, but other activities can also utilize this setting, where students work together, such as Choices or Wikis.
- For assignments, edit settings > open the "Shared (team) submissions" and select the "Students submit as teams" option makes "team submissions" possible (so the submissions are shared).
Groupings - different set of groups in one course
Advanced Material – Groupings
Using different sets of groups & restricting access to items
Sometimes you will not use the same groups of students for the whole course and you will need a different setup for different activities. The Groupings function is designed for this purpose. A grouping is a collection of groups within a course, also used to restrict access to an item to a subset of students.
For example, you may create a set of groups for the course in general and a separate set for a particular project.
How to set up Groupings
To use Groupings you must first have created at least one group (see the process on the previous page).
- Click on the Groupings tab at the top of the Groups page.
- Click the Create grouping button, type a name for the grouping and save changes.
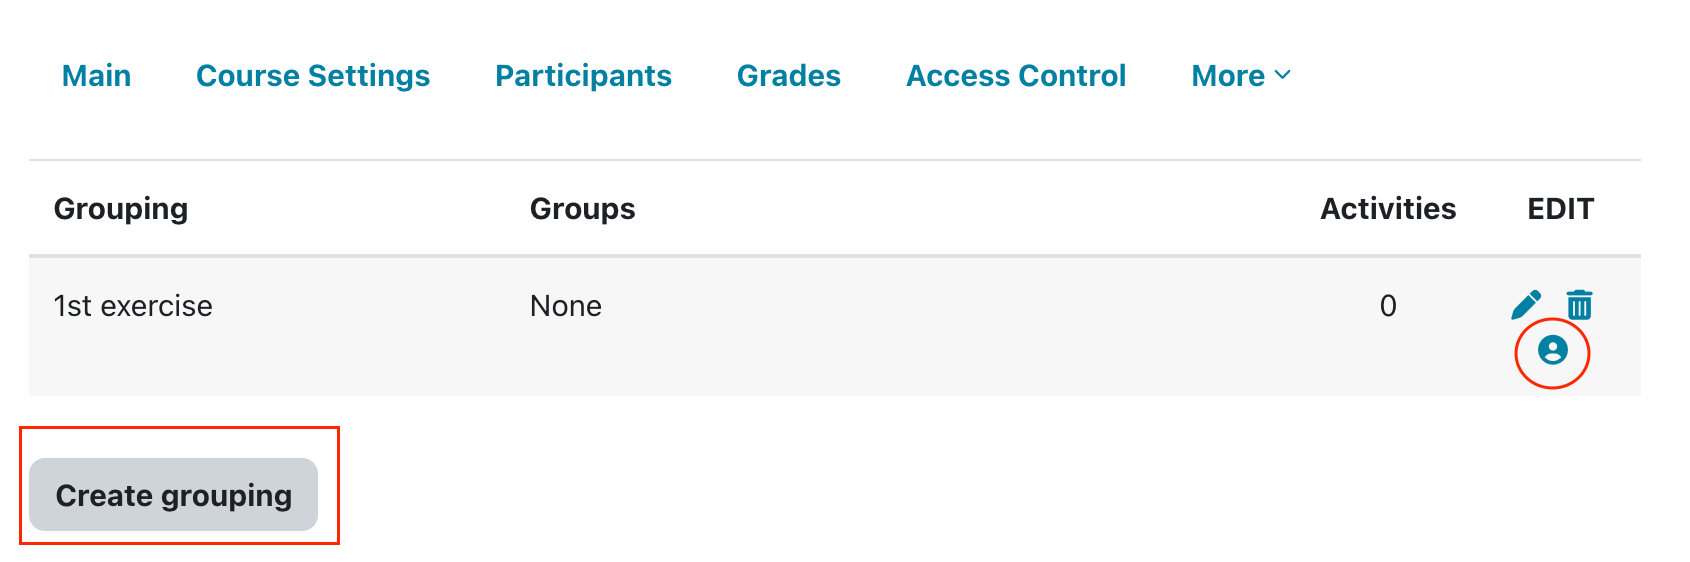
- Add groups to the grouping:
- On the Groupings page click the Assign icon in the edit column.
- Use the Add button to place the appropriate groups into the grouping.
- Apply a grouping to an activity or resource:
- Go to the activity or resource and click on the Edit icon next to it.
- Scroll down and open Common module settings and set Group mode to separate groups as a prerequisite. Then select the appropriate grouping, then click Save and return to course.
If a grouping is selected, then all users assigned to the groups within the grouping will be able to use the activity, but they will still work by groups in that activity as usual.
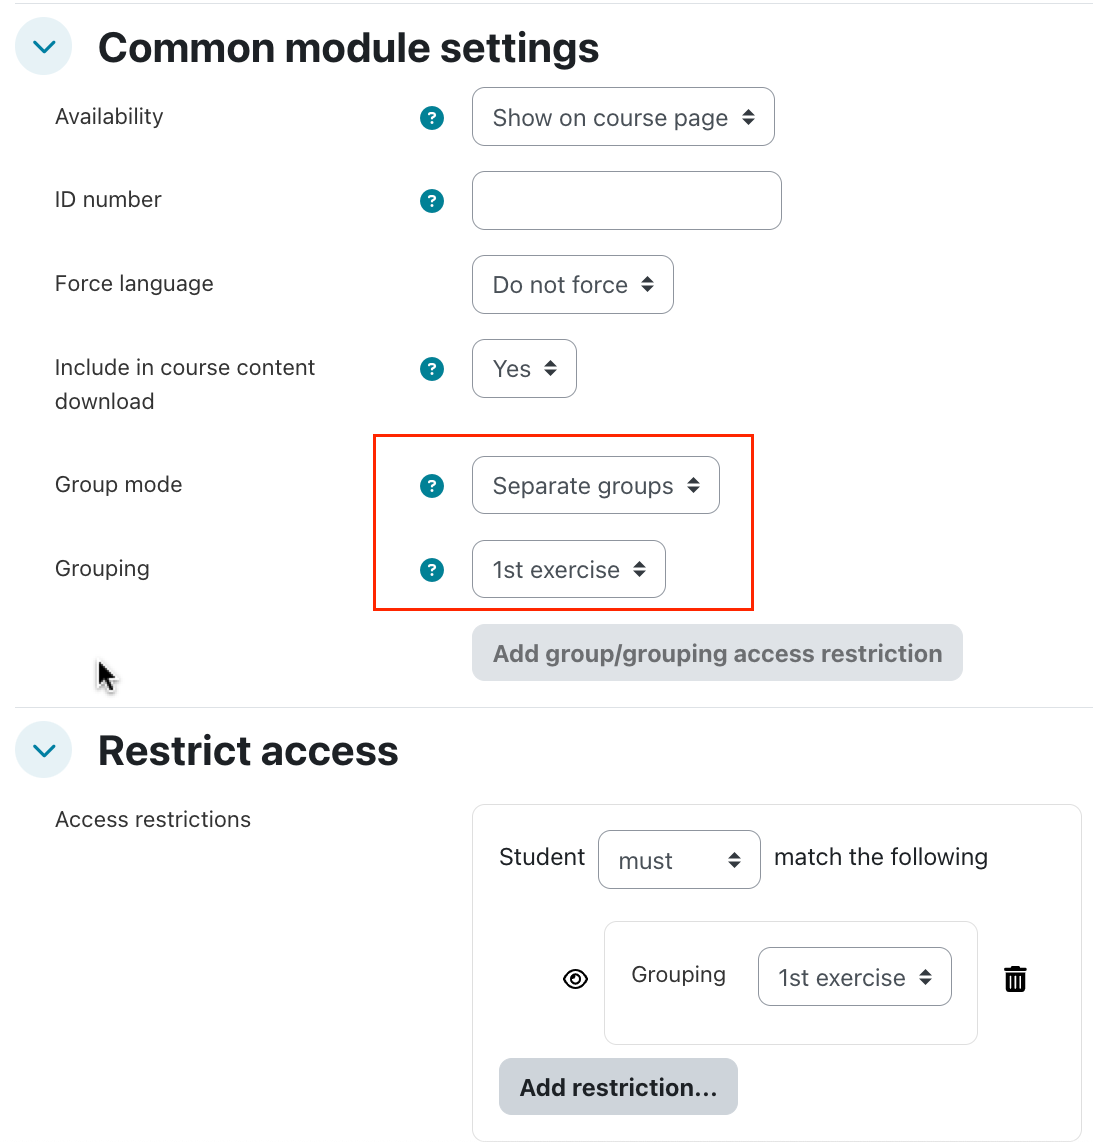
Note: If you click on the "Add group/grouping access restriction" button, then the activity (or resource) will only be available to users assigned to groups within the selected grouping (or to any group member if no grouping is selected). For other users this activity will be completely invisible.
Examples for Groupings
Example 1 – Not all students need to participate in all activities
You have 12 students and 4 different projects. Six different students work on each project, and all students will take part in 2 projects.
- Create 4 groups (Team 1, 2, 3, 4) and assign the appropriate students:
- Team 1: A, B, C, D, E, F
- Team 2: G, H, I, J, K, L
- Team 3: A, B, C, G, H, I
- Team 4: D, E, F, J, K, L
- Create 4 groupings (Project 1, 2, 3, 4).
- Assign the groups to the groupings (Team 1 → Project 1, etc.).
- Create an individual forum for each project (4 forums total). In each forum:
- Set Group Mode = Separate Groups
- Select the appropriate Grouping (e.g., Project 1)
- Check Available for group members only
Result: Each student will see only the 2 project forums they are members of and will be able to work with only the other team members for that project. You will see all four groups and easily supervise the work in them.
Example 2 – Everyone participates, but group composition changes
Now suppose you have the same 12 students and 2 different projects. All 12 will take part in each project, but with different groupings.
- Create 6 groups (Teams 1–3 for Project 1, Teams 4–6 for Project 2):
Project 1 groups:
- Team 1: A, B, C, D
- Team 2: E, F, G, H
- Team 3: I, J, K, L
Project 2 groups:
- Team 4: A, E, K, D
- Team 5: B, I, H, J
- Team 6: G, L, F, C
- Create 2 groupings (Project 1, Project 2).
- Assign the groups to the groupings (Teams 1–3 → Project 1, Teams 4–6 → Project 2).
- Create an individual forum for each project (2 forums total). In each forum:
- Set Group Mode = Separate Groups
- Select the appropriate Grouping (e.g., Project 1)
Result: Each student will see both project forums and will be able to work with the appropriate teammates for each project.
Panopto - share/upload videos in Moodle
You can add a video into the course as a Panopto video activity - enrolled students will have access automatically (but will not be able to download them).
Open the course > Turn edit mode on > Add an activity or resource > Select Panopto video > Click on "select content".
- A pop-up window will appear.
Important: If you get an error message or the popup window prompts you to log in:
- Enable the 3rd party cookies in your browser
- Disable any adblocker extensions in your browser
- After you changed your settings close and reopen the browser
a) If you have your video on your computer
Select the "Upload' tab. Select the video from your computer > wait until it is uploaded > Click insert and save the form.
If you do not change the default folder, the video will be uploaded into the Panopto folder of the course. After the upload/processing is ready, students will have access.
b) If you have the video in Panopto already
Choose the folder > Select the video at the popup window (you may need to change folders in Panopto) > Click insert and save the form.
Your own CEU Zoom recordings can be found in Panopto under my folder/meeting recordings subfolder.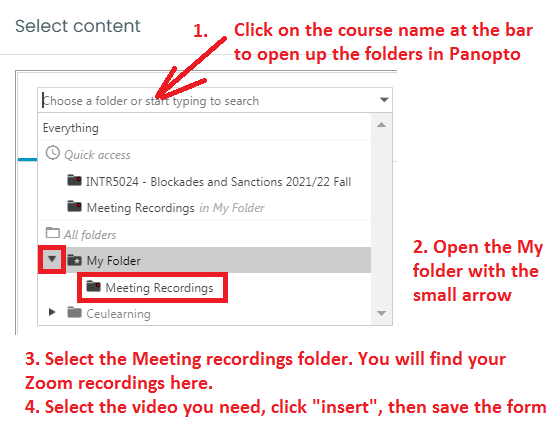
If the video is not stored in the folder of the course, students will have access, but other teachers of the Moodle course will not have editing rights, they will be able to view it only.
Useful links to get started:
Panopto links
CEU IT sharepoint site
III. Existing Panopto videos in Moodle courses
When you import your course to the new academic year, the Panopto video activities will be shared with the new students automatically.
- Share the videos with the Panopto activity method (see above) and delete the embedded videos from the new course
or - Make the videos public in Panopto / give access to the students in Panopto
https://support.panopto.com/s/article/Share-a-Video
or - Write to acsg@ceu.edu with the title of the original course (where the videos was originally uploaded) and the new course, and we connect them, so new students can watch the videos.
How to enable students to upload videos into Panopto (assignment folder)?
It is possible for students to create short videos in Moodle (2 min max) directly. Help
If longer videos need to be created or shared, it can be done with Panopto - but by default, students do not have rights to create / upload videos in Panopto.
This can be done two ways:
I. Creating an assignment folder in Panopto for the course, which enable all students of this course to upload videos to this folder
II. The students ask for video editing rights and personal Panopto folders from the Classroom support colleagues individually - Help
Option I. - Create an assignment folder in Panopto for the course
Step 0. If you uploaded a Panopto video from the course, it already has a folder in Panopto. If not, just start the process (Editing mode on > add an activity > Panopto video) - you do not need to actually upload a video, the folder will be created in Panopto.
https://ceu.cloud.panopto.eu/
It will ask you to log in (select CEU Azure method- needs your CEU email address + password).
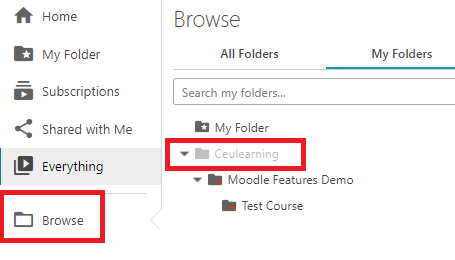
Open the folder of the course in Panopto. You can find this with Browse > Ceulearning > course name.
You can find the "Create Assignment Folder" option on the overview tab of the folder's Settings menu.
After you create it, students will be able to upload / create videos into this folder, but will not be able to watch the videos of other students.
If you would like students to watch each others videos you need to change a setting: "Allow viewers to see each other's sessions" menu item is in the Settings menu for the Assignments folder.
See a short animated gif depicting the steps.
Step 3. Share the link of the assignment folder with the students.
They can login this way: https://ceu.cloud.panopto.eu/
It will ask you to log in (select CEU Azure AD method- needs your CEU email address + password).
Instructions: https://ceuedu.sharepoint.com/sites/itservices/SitePages/panopto_upload.aspx.
Option II. - Individual access for the students (help from Classroom support)
If the students recorded their assignments on their computer, they could upload them to Panopto by following these instructions:
https://ceuedu.sharepoint.com/sites/itservices/SitePages/panopto_upload.aspx.
But first, they need to login to Panopto here: ceu.cloud.panopto.euAfter that, all of them should get in touch with classroom support to create their folders.Once their folders are ready, they'll be able to upload their videos by following the instructions at the link above.Lastly, they can share their videos with you through Panopto by following these steps: https://ceuedu.sharepoint.com/sites/itservices/SitePages/panopto_share_record.aspx.
Video recording with Panopto
Video recording with Panopto
If you never used Panopto before, contact the classroom support and ask for creator rights
Login to Panopto at https://ceu.cloud.panopto.eu

How to record videos
Short audio and video directly from Moodle
Directly record sound and video from the Moodle editor
Buttons in the Text editor now allow you to record videos or audio directly into Moodle if your device has a camera/microphone (both for students and instructors). This is usable for quick, short responses, the time limit is 2 minutes. This feature could be really handy with forum posts and giving feedback at assignments.
How does it work?
Video: https://www.youtube.com/watch?v=gr4mw1qvcWM
Interactive videos and presentations with H5p
Interactive videos and presentations with H5p
Create interactive presentations and videos with a new, user friendly method directly from Moodle. Note: the activities created could be used for practice activities for now (no grading available)
How to create one? (quick, without interactive elements)
How to create one? (detailed)
https://h5p.org/content-types-and-applications
Perusall
Basic info (video)
Detailed article
If you would like to use Perusall for your course, Turn edit mode on > add an activity or resource and select the activities tab and "Perusall" from the activities list. Add a title and if you do not want to grade this activity change the Grade > Type to "none", otherwise it will appear in the gradebook. You do not need to change any other settings.
CEU takes no responsibility for the privacy policies of any linked websites and is not responsible for their content.
Privacy notice: if you use a Perusall external tool activity in your Moodle course, the LMS sends Perusall information about the user and course when it is launched. Perusall utilises the following user information: user role in course, name (first, last, full), e-mail address, and profile image (if any). It also collects course information including course name, assignment name, if applicable, and grade passback information, if applicable.
It is recommended that you advise students that their information will be transferred over to Perusall, but will be kept confidential and will not be shared outside the course users. The information is shared to enable synching with Moodle for Gradebook purposes.
https://app.perusall.com/legal/privacy
Detailed help about this:
https://ceu.libguides.com/moodle
Zoom meetings
CEU has a subscription to Zoom. To create a Zoom meeting from Moodle, you need a CEU Zoom account assigned to your CEU email address.
Please register an account via https://ceu-edu.zoom.us/. Here you just need to log in with your Microsoft account and password to activate your own Zoom account.
Make sure your email on Zoom matches your email on this system. If you have problems, contact the Classroom Support.
After you
have access to the CEU subscription with your CEU email address, you
will be able to create Zoom meetings directly from Moodle.
1. Add an activity or resource > Activities tab > Zoom meeting.
2. Fill in the form (name, description) and decide if this will be
a) a one time meeting (it will close after the duration) - set a start time
b) a recurring meeting - tick the box with the same name. This meeting will be open indefinitely, so one activity with the same link can be used throughout the term.
If you will co-teach the course (or just create the meeting), make sure, that you add the email address of the other instructors at the "alternative hosts" box, so they can start the meeting and have the same rights. (they need a CEU zoom account as well).
You may change other settings if needed (read the help for these next to them with the ? icon) and Save.
3. The meeting is created in Zoom. You can open it in Moodle with the link and need to Start it with the button (for recurring meetings, every time). Students of the course will see this as an activity, and can join from the Moodle course, but you can also copy / paste the "join link" as well and send it to them if you wish.
Important note:
All CEU licensed Zoom accounts are connected to Panopto thus every Zoom recording made into the cloud ends up in Panopto under my folder/meeting recordings subfolder.
You can share these recordings with your students in a Moodle course with the Panopto video activity easily.
Turnitin - plagiarism detection software
Instructors can use Turnitin two ways in CEU:
1. In Moodle with the assignment activity
The students submit their papers themselves to an assignment you created in Moodle. If you set the “Turnitin reports” to Enable, all papers what students submit will be sent automatically to Turnitin and the report will be created. This is the easiest and recommended method.
You can not submit files for the students, they need to do it themselves.
Details: http://ceulearning.ceu.edu/mod/book/view.php?id=75454&chapterid=871
2. Instructors submit the student papers to their own Turnitin account.
If you did not use Turnitin in Moodle before or have an issue with login, please contact me.
After login follow these steps to upload a paper (enable Quick submit first) :https://guides.turnitin.com/hc/en-us/articles/22045746358669-Activating-quick-submit
Help about the Originality report:
https://youtu.be/0VBMgPlz_5g?t=31
Typical plagiarism cases:
- Original summarized version from the Internet archives
- New, full version (more detailed, but needs time to study)
How to manage Thesis submissions after EtD?
The Electronic Thesis Submission was replaced by Proquest ETD Administrator, and unfortunately this does not have the same functions as our old software had, in particular it is not able to generate Turnitin reports of uploaded thesis. Regarding the whole process and the new ETD system, contact Erika Mathe.To compensate for this lack of function, you can use Moodle courses, and the Assignment with Turnitin enabled where students can upload their final thesis as well. Please find the necessary steps below.
1. Course
a) Many departments already used a Moodle course to handle parts of the Thesis submission process - submitting Progress Reports, drafts and chapters. If a course like this exists, it can be used to add an extra step into this making this more convenient (as students have access to this already).
b) If this is not the case, we can create the necessary course in Moodle. If it does not exist yet, check here and request which course needs to be created:
https://ceulearning.ceu.edu/local/sitssync/view.php
2. Access
Students have access automatically if the course is synced from SITS.
Instructors (supervisors) need to be assigned or you can send them the reports in PDF format manually.
In general they should be assigned with the "non-editing teacher" role, as most of the time they do not need to be able to edit the course, only see the submissions and grade. Also this make it possible to set up groups as well, grouping students and instructors together (and each instructor will see only his own students submissions).
https://ceulearning.ceu.edu/mod/book/view.php?id=75454&chapterid=750
3. Create an assignment with Turnitin enabled (details)
Other settings which may be relevant if you would like to separate the students between supervisors. For this groups need to be set up in the course.
- Submission notifications:
Moodle allows teachers to receive notifications when students submit assignments, when they submit assignments late, or for both cases. This feature alerts graders about new submissions or reminds them to check assignments submitted after the due date. These options can be configured under the “Notifications” menu:
Notify graders about submissions – sends a notification for all submissions.
Notify graders about late submissions – sends a notification only for assignments submitted after the due date.
If supervisors are put into groups with their students, they will get notifications only for their own students - see separate groups below.
- Common module settings > group mode > separate groups
If you use this setting, students submit individually, but it will be possible to distribute students among teachers. For this you need to add the graders with "non-editing teacher" role to the course or change the permissions on the assignment for other teaching roles and assign the instructors and students in groups.
After this, the instructors will see only their own students. This may be useful for example for thesis supervisors.
Important: make sure you are not using the "Shared (team) submissions" > Students submit as Teams" setting, as this makes the submitted papers shared by the group members.
4. The assignment can be used for supervisors to give feedback